AirGradient Monitor Firmware Updates
AirGradient Monitor Firmware Updates
AirGradient ONE - Firmware Update
This page provides everything you need to manually update the firmware on your AirGradient ONE (I-9PSL-DE, I-9PSL-DE-CE)
Video Guide: AirGradient ONE - How to Flash Firmware
Before you begin, you need:
- A computer (Windows, macOS, Linux) with a supported browser.
Firmware flashing requires a Chromium-based browser. One of the following browsers will work:
- Google Chrome
- Microsoft Edge
- Chromium (Linux)
Note: The Flash button will NOT appear on Safari, Firefox, or any non-Chromium browser.
- A USB-C cable that supports data transfer (not charge-only). The cable that comes with the monitor will work.
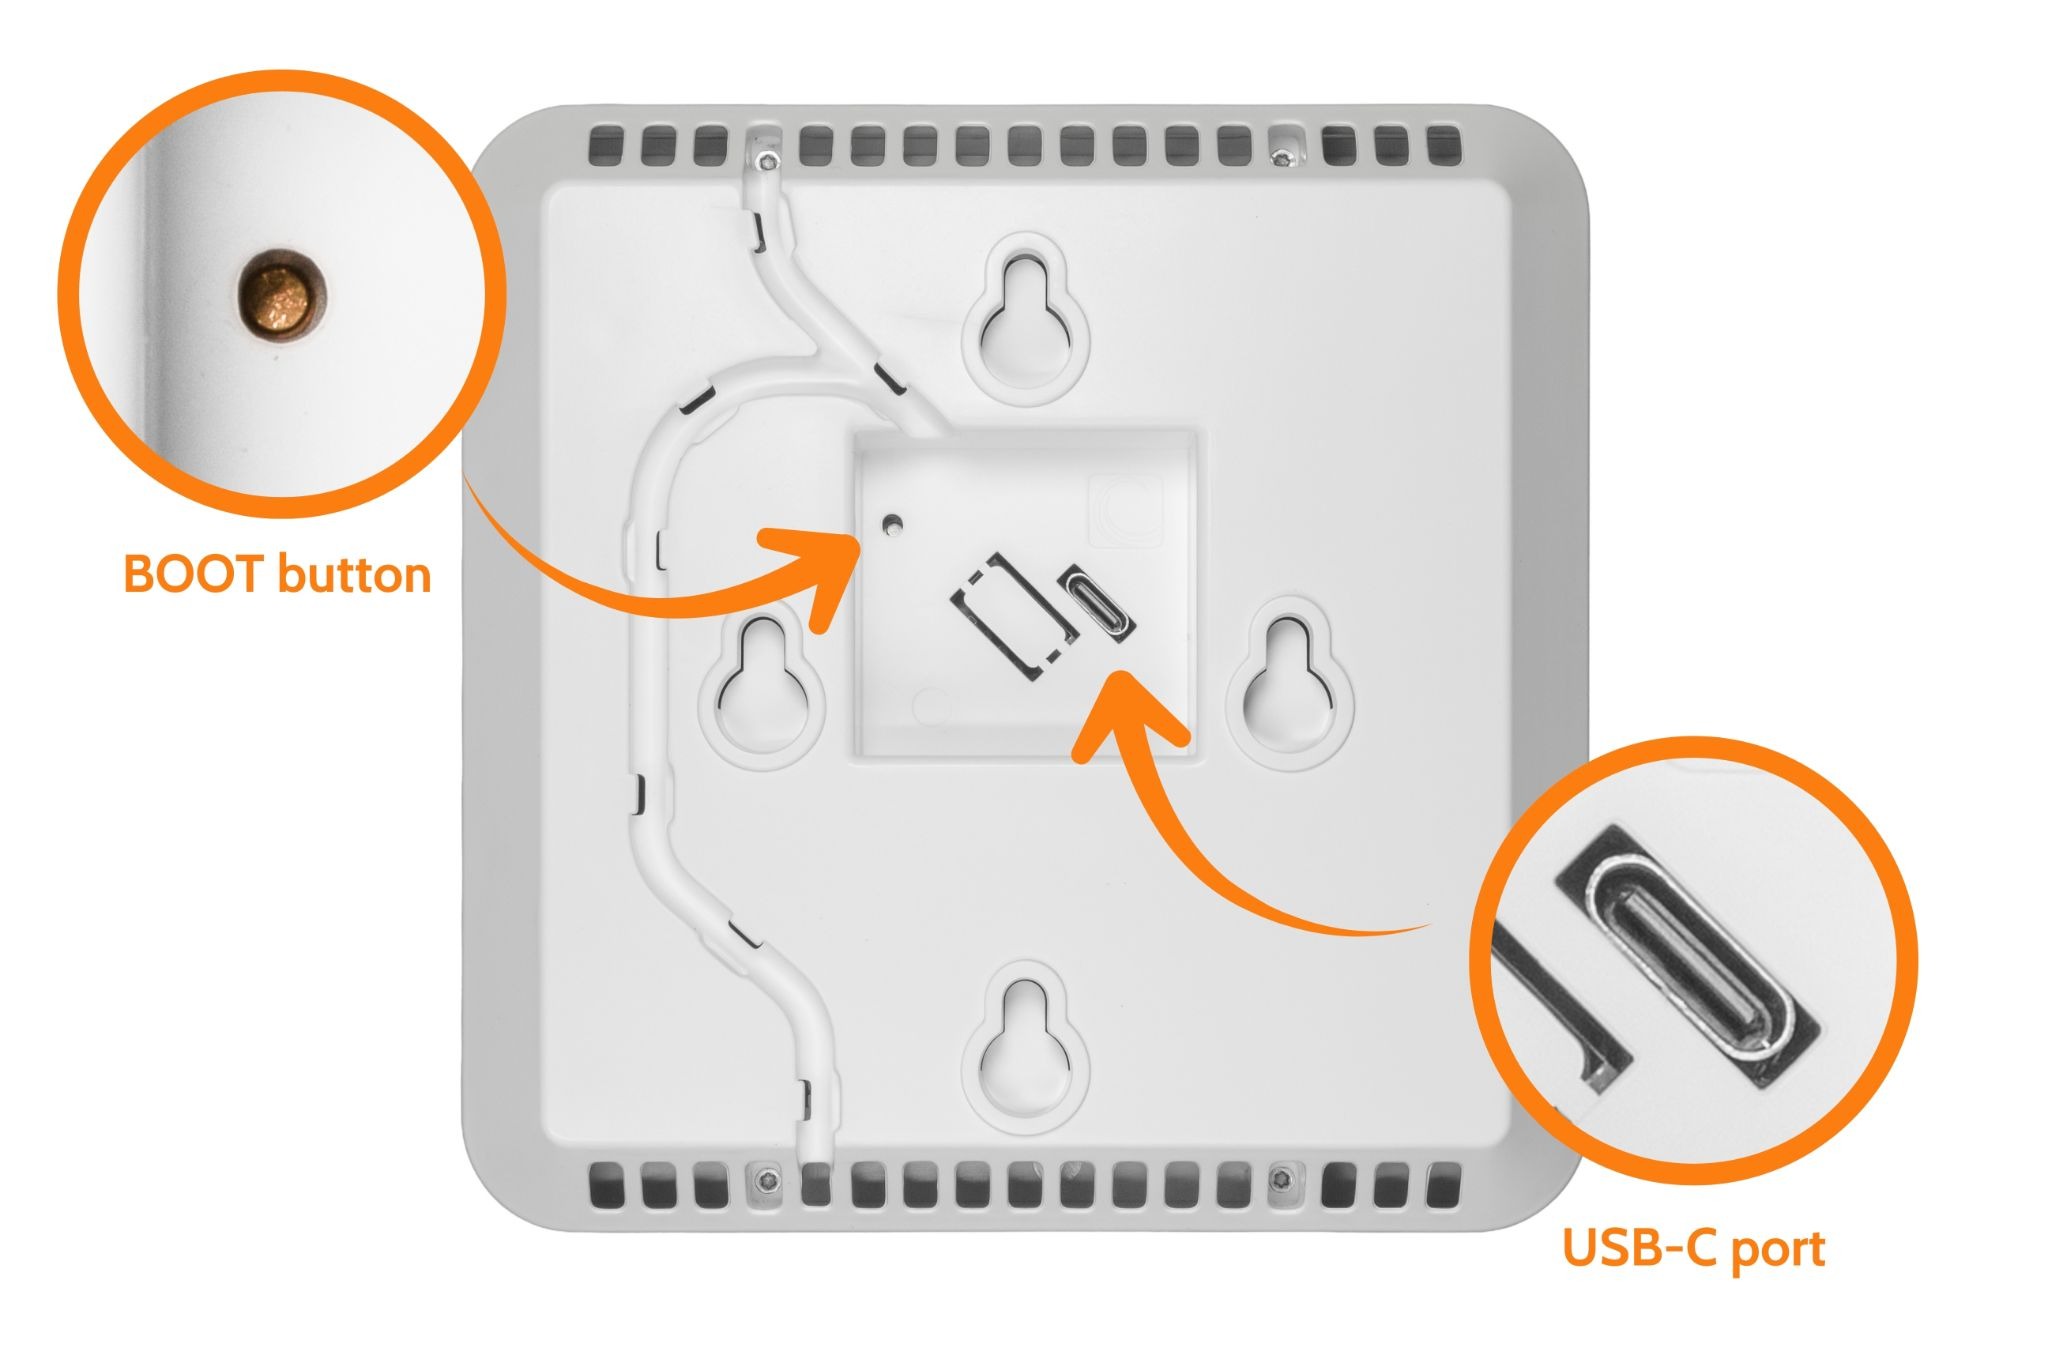
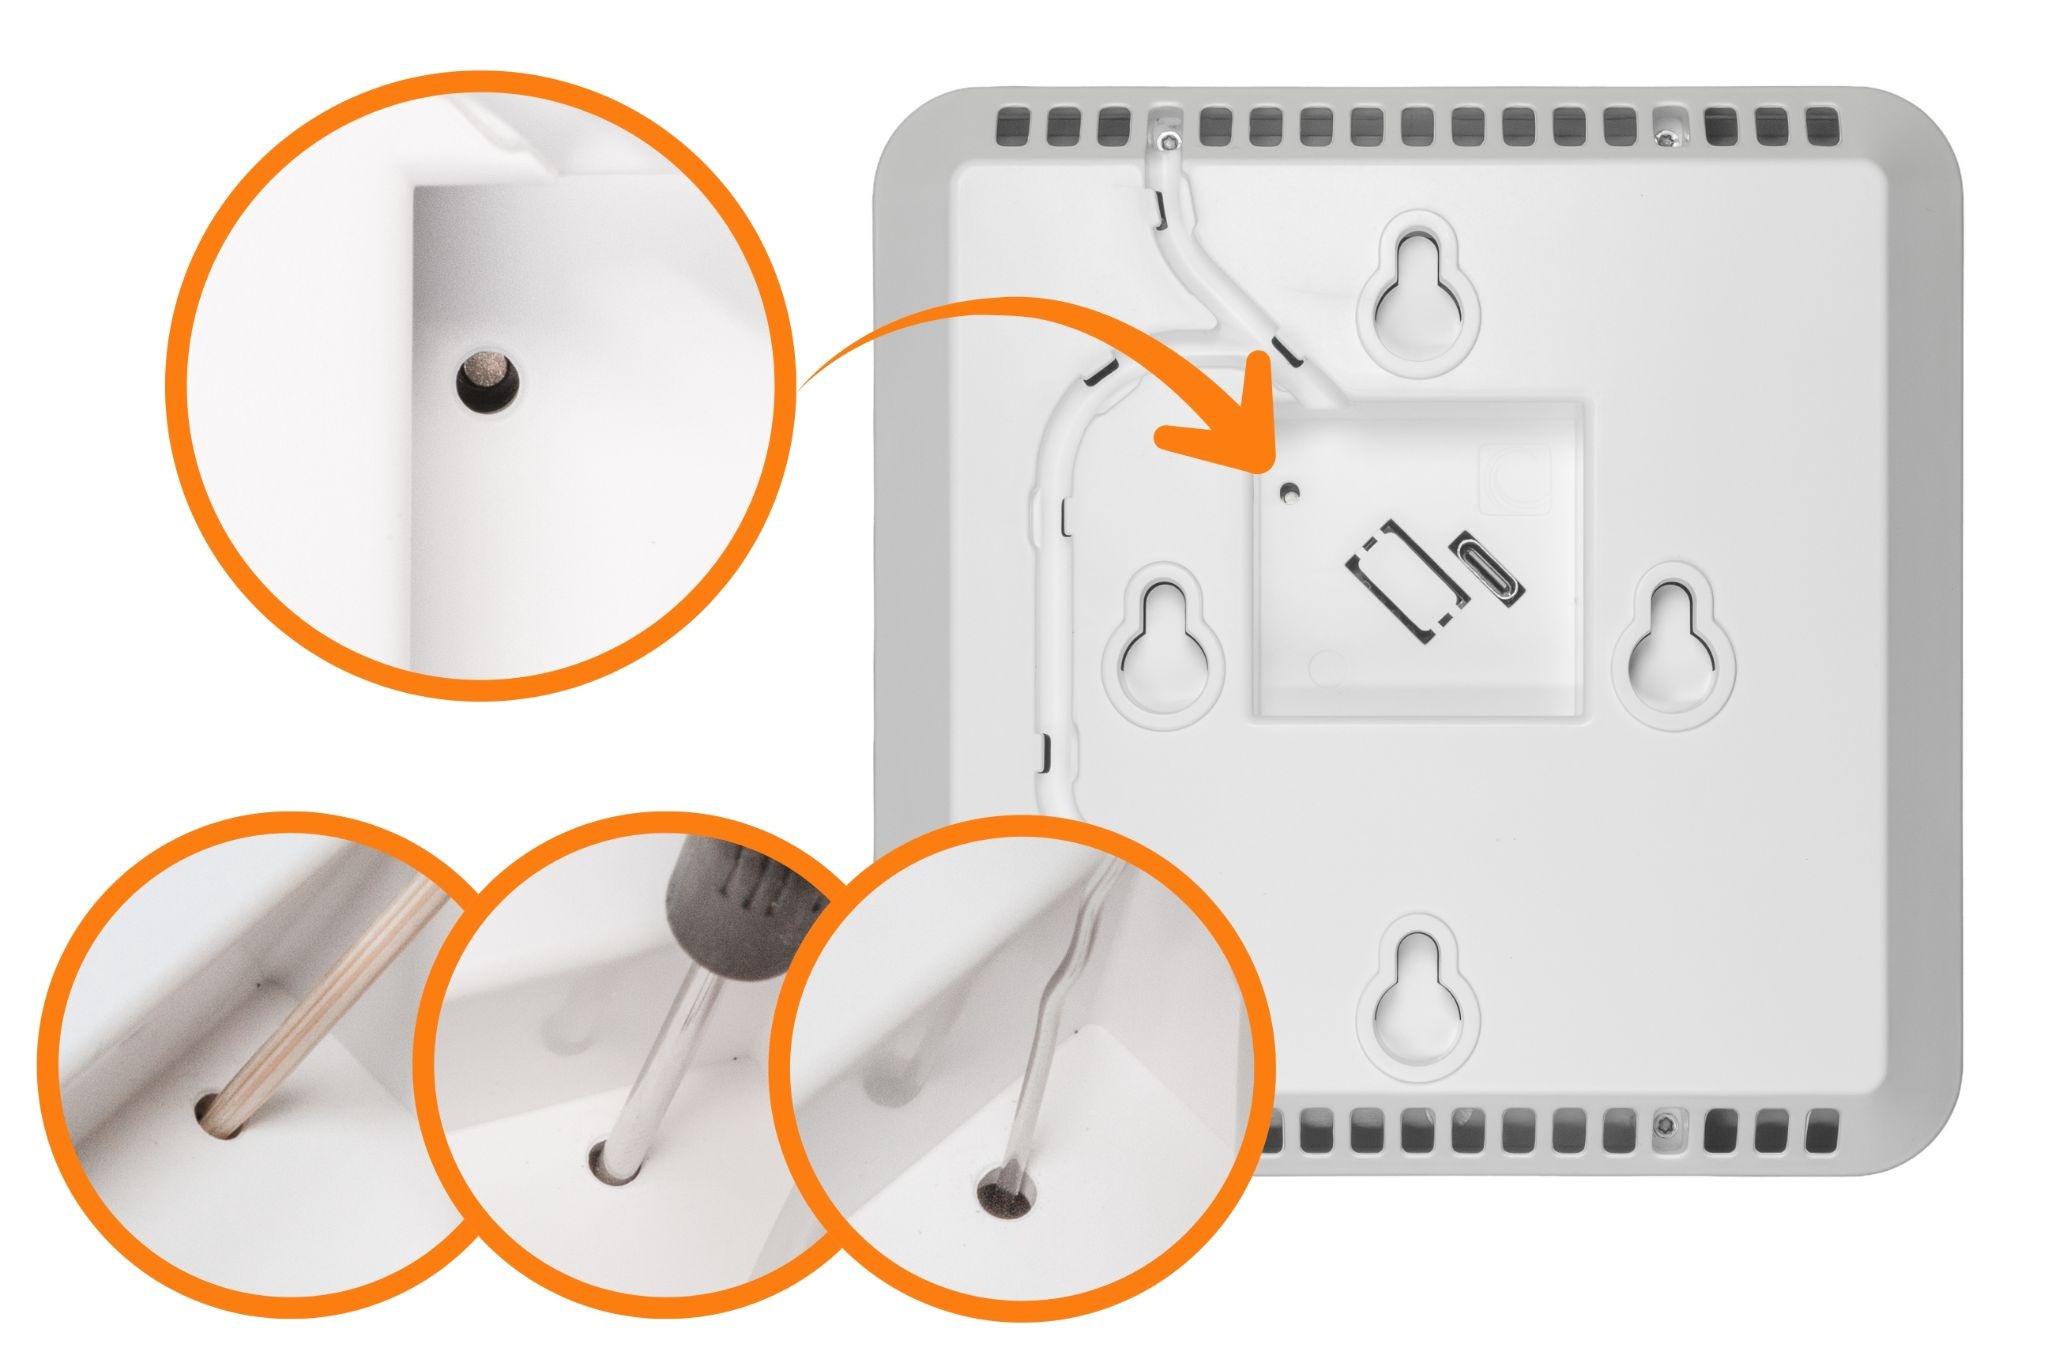
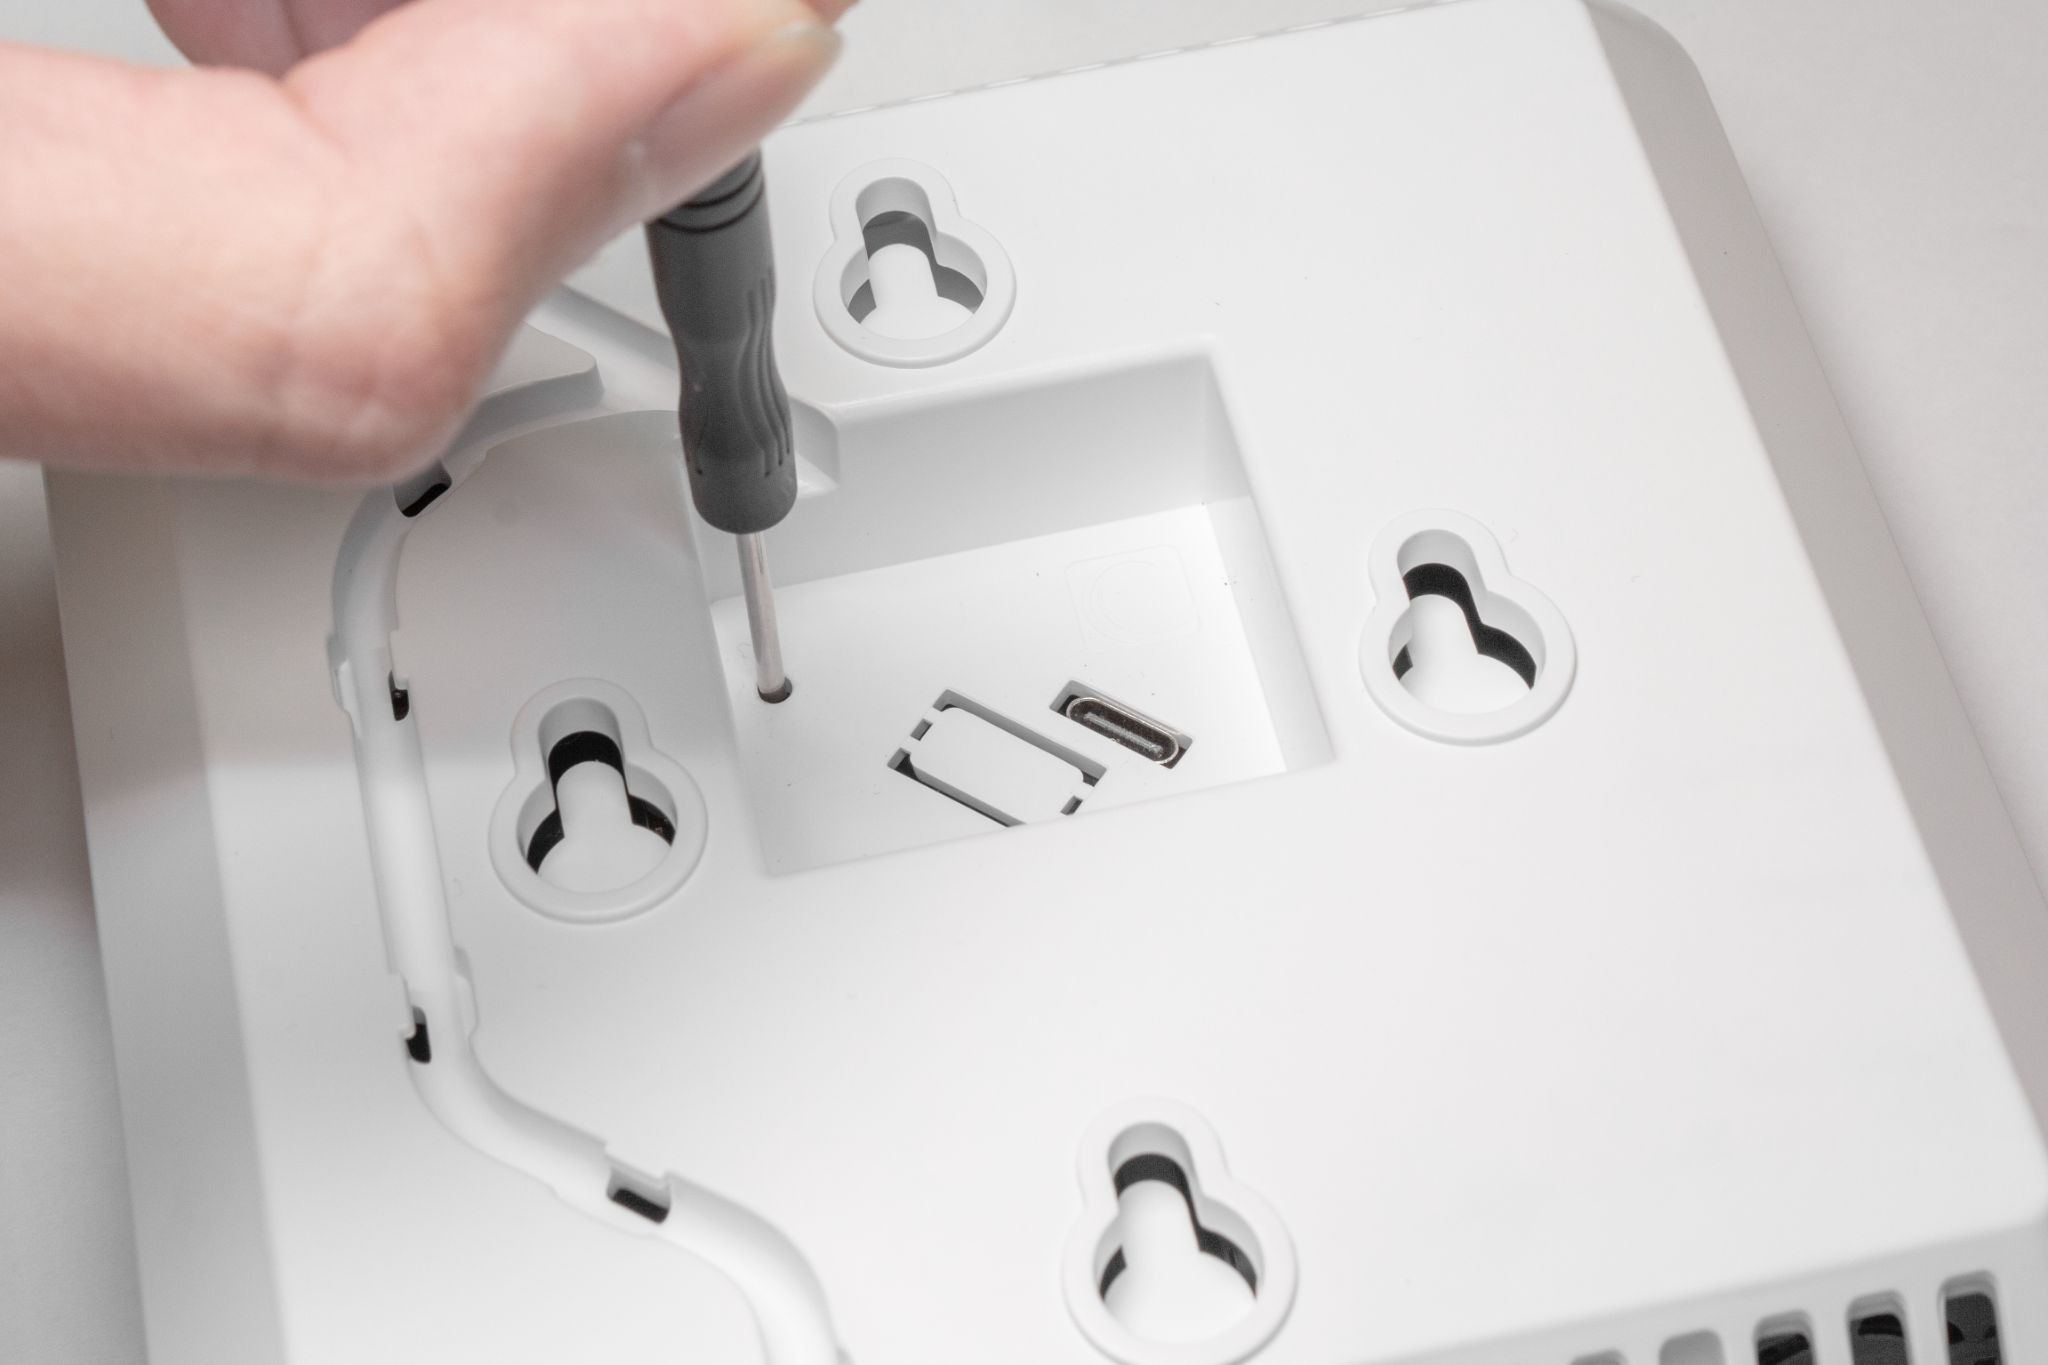
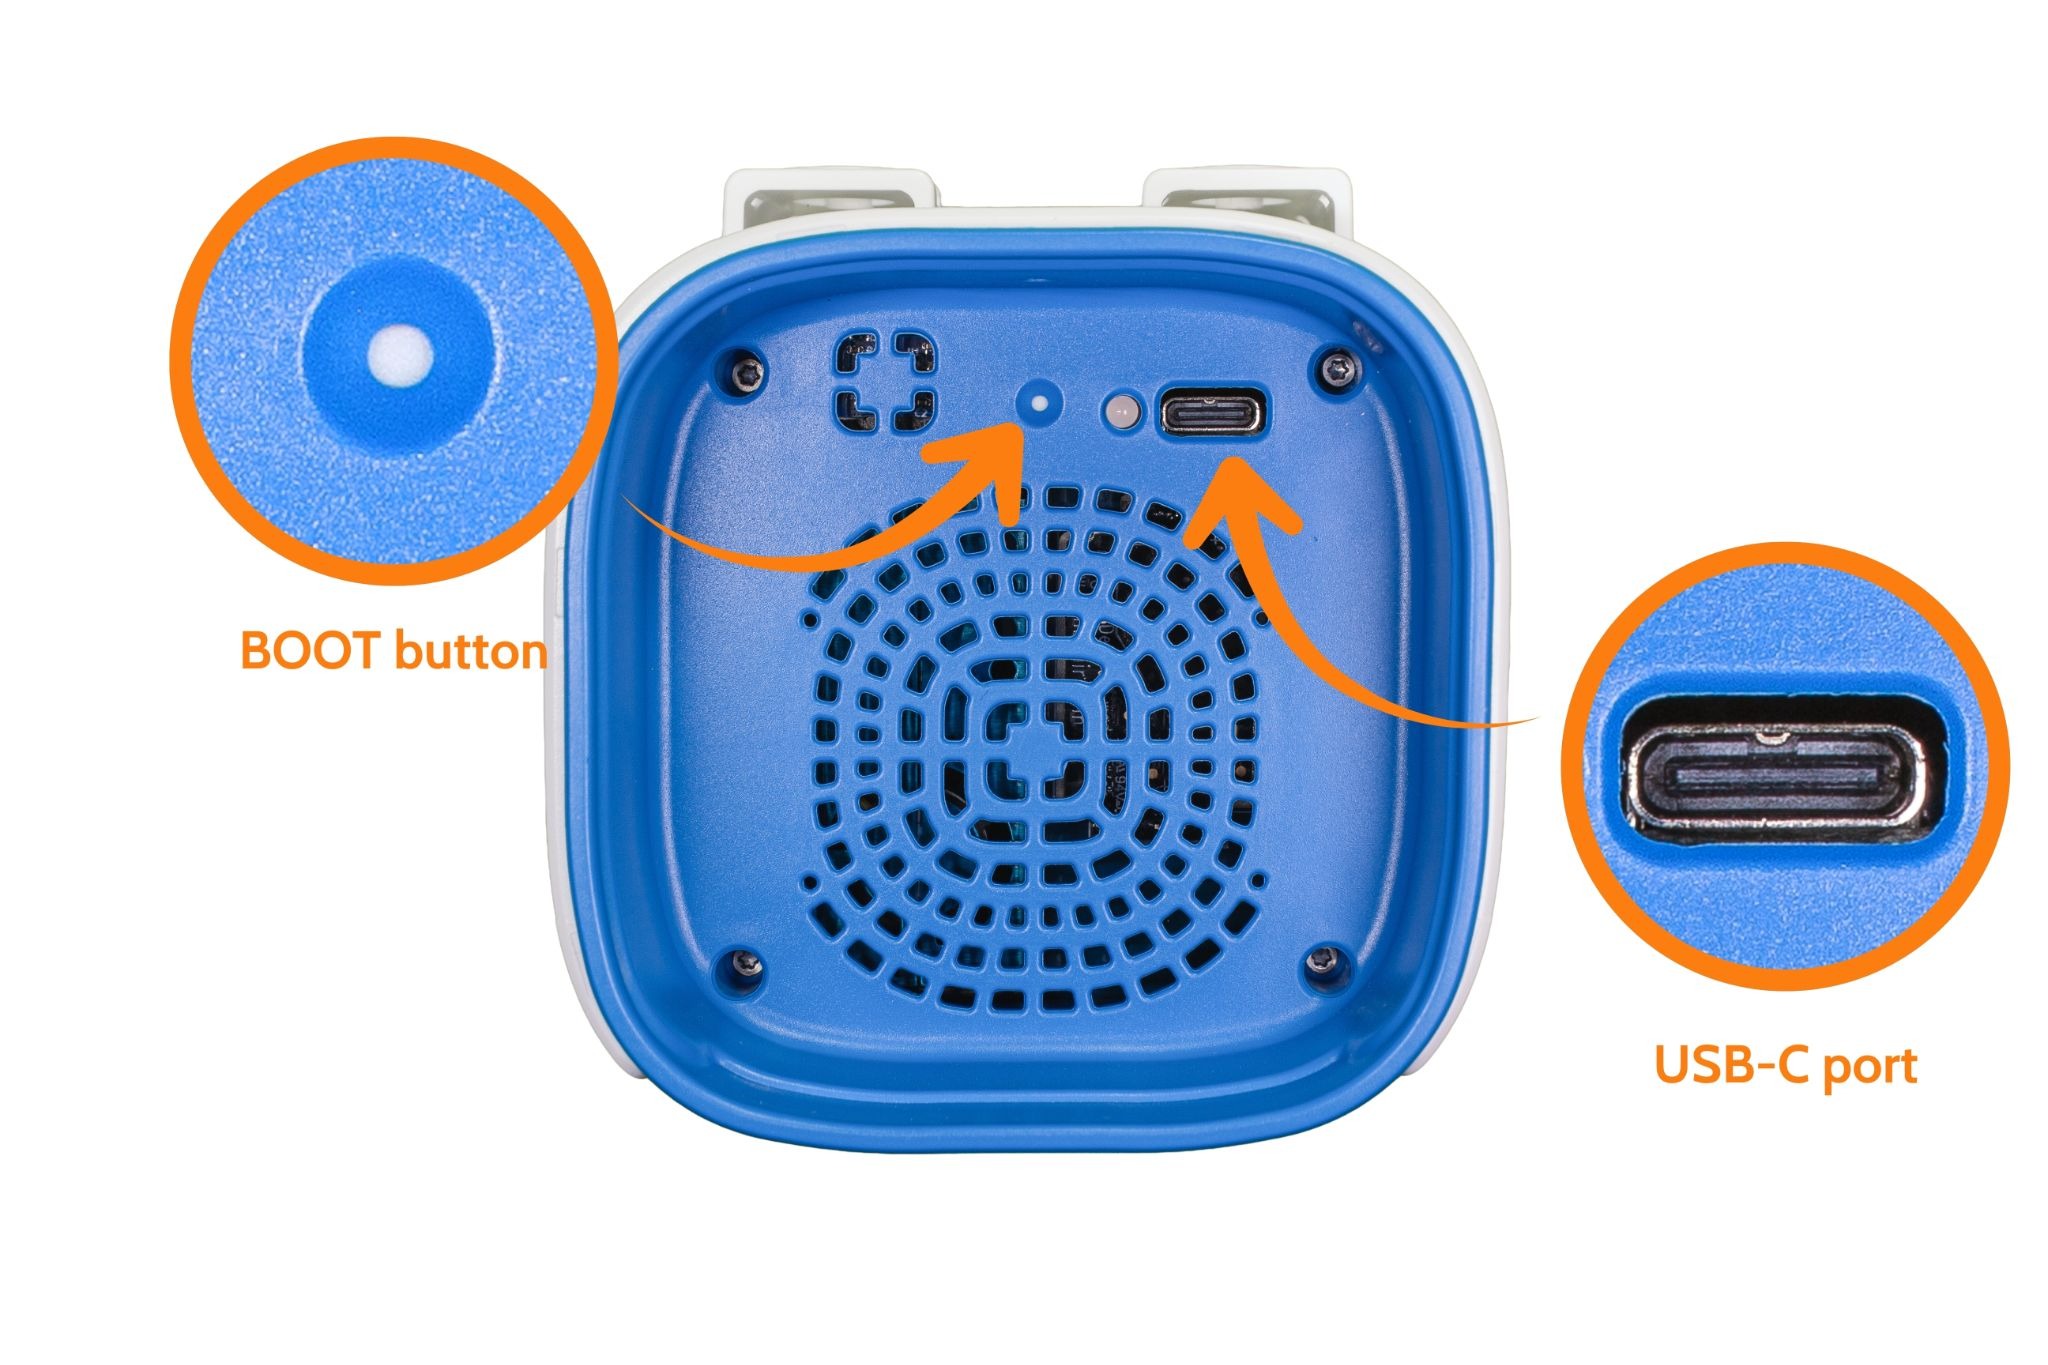
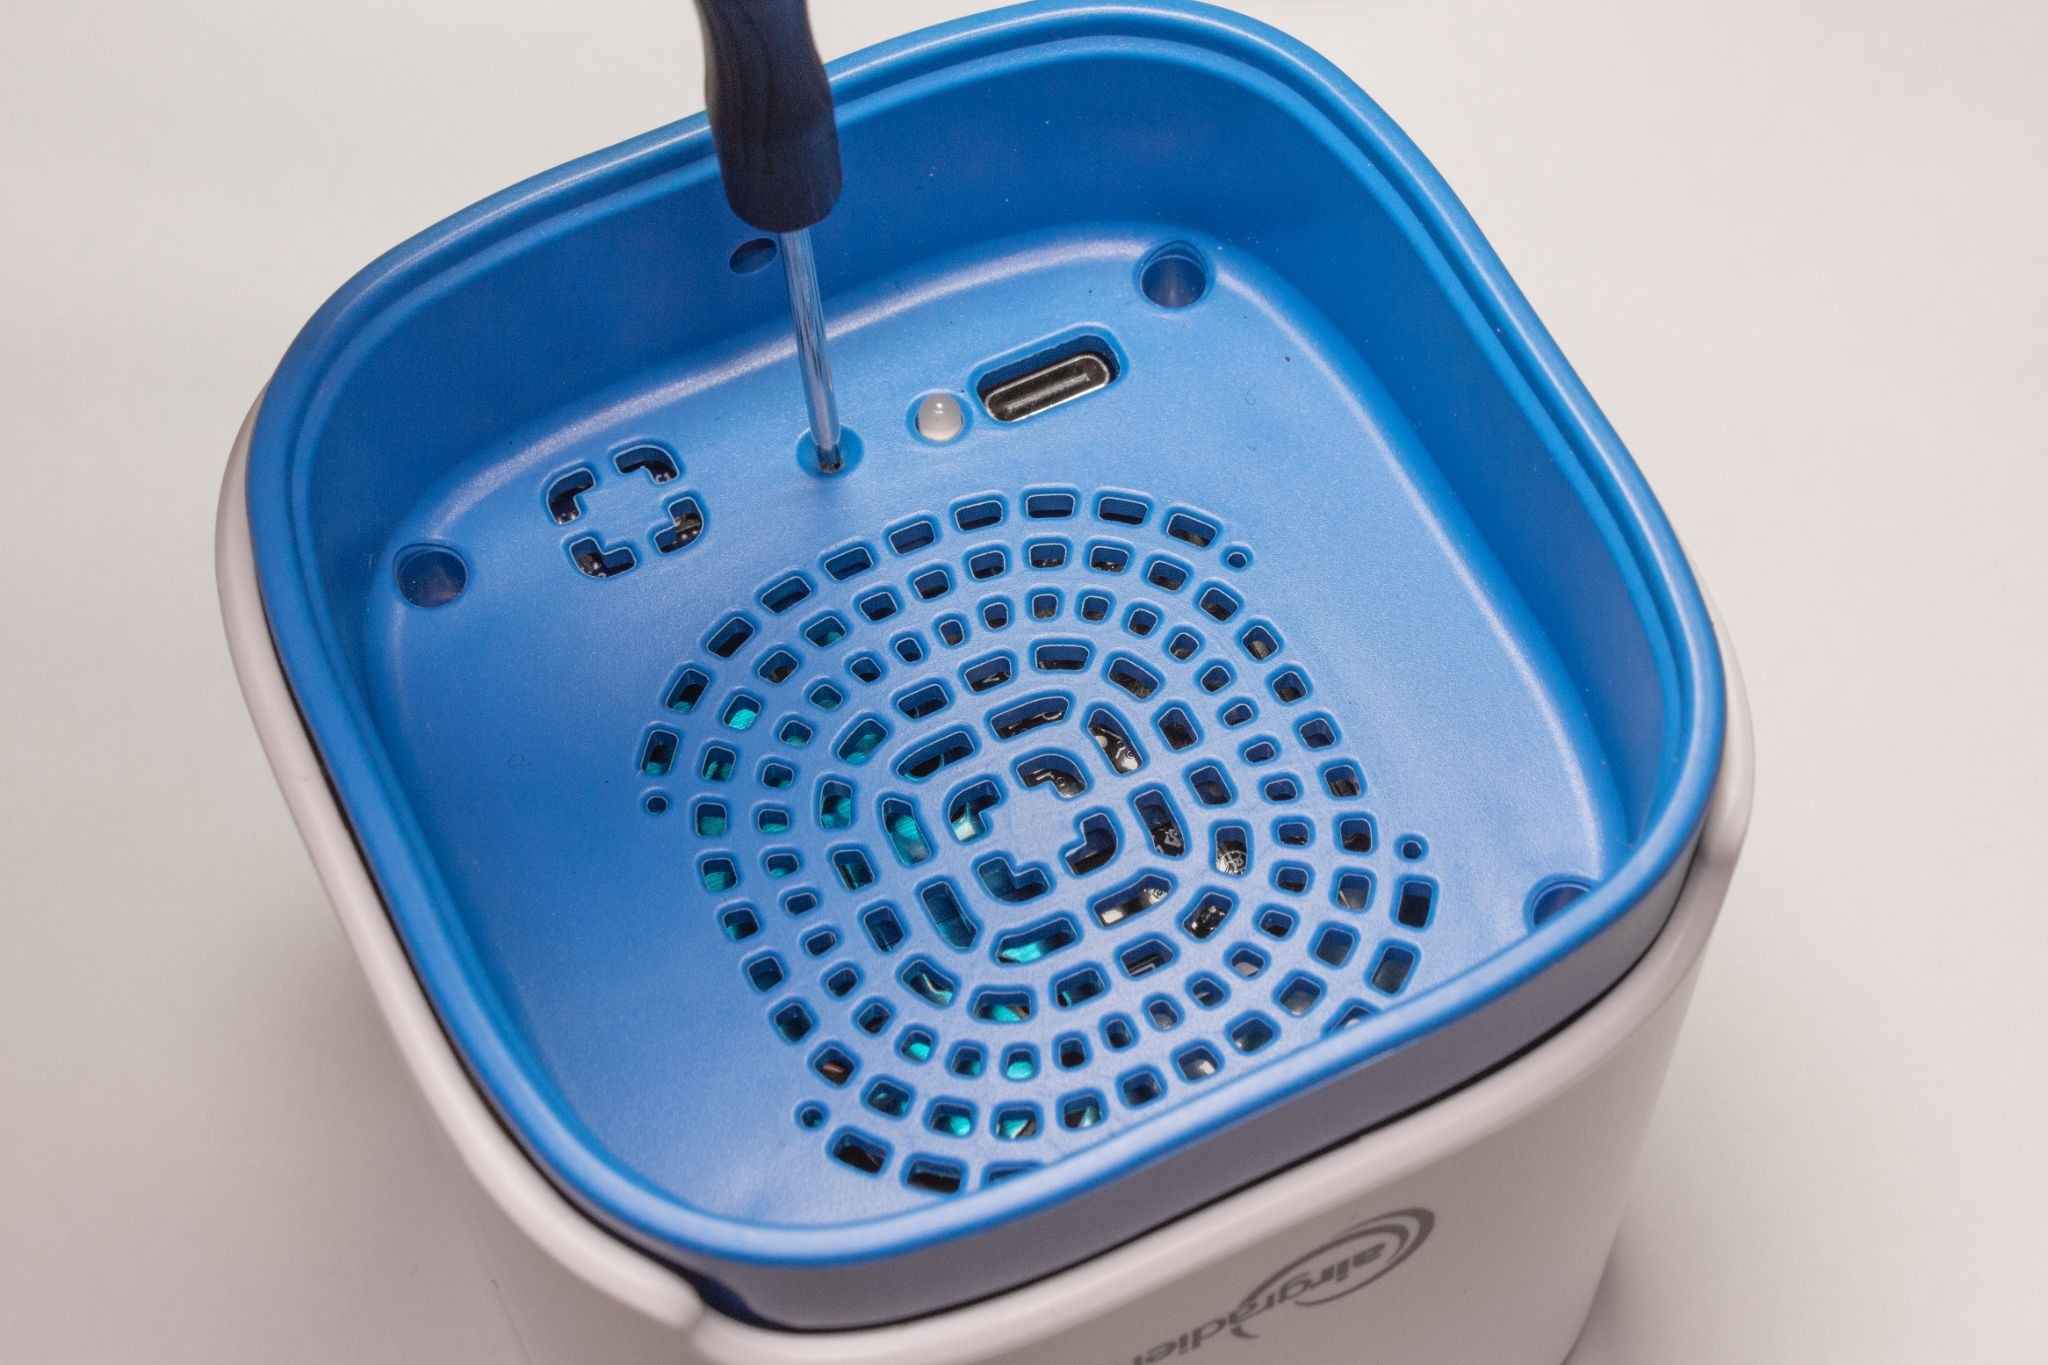
- A tool (paperclip, toothpick, small screwdriver) that fits through the pin hole on the back of the device to reach the BOOT button. This is because the BOOT button is on the mainboard inside the enclosure.
Follow the steps below carefully to ensure a successful update.
Step 1: Enter Flash Mode
- Press and HOLD the BOOT button on the back of the AirGradient ONE:
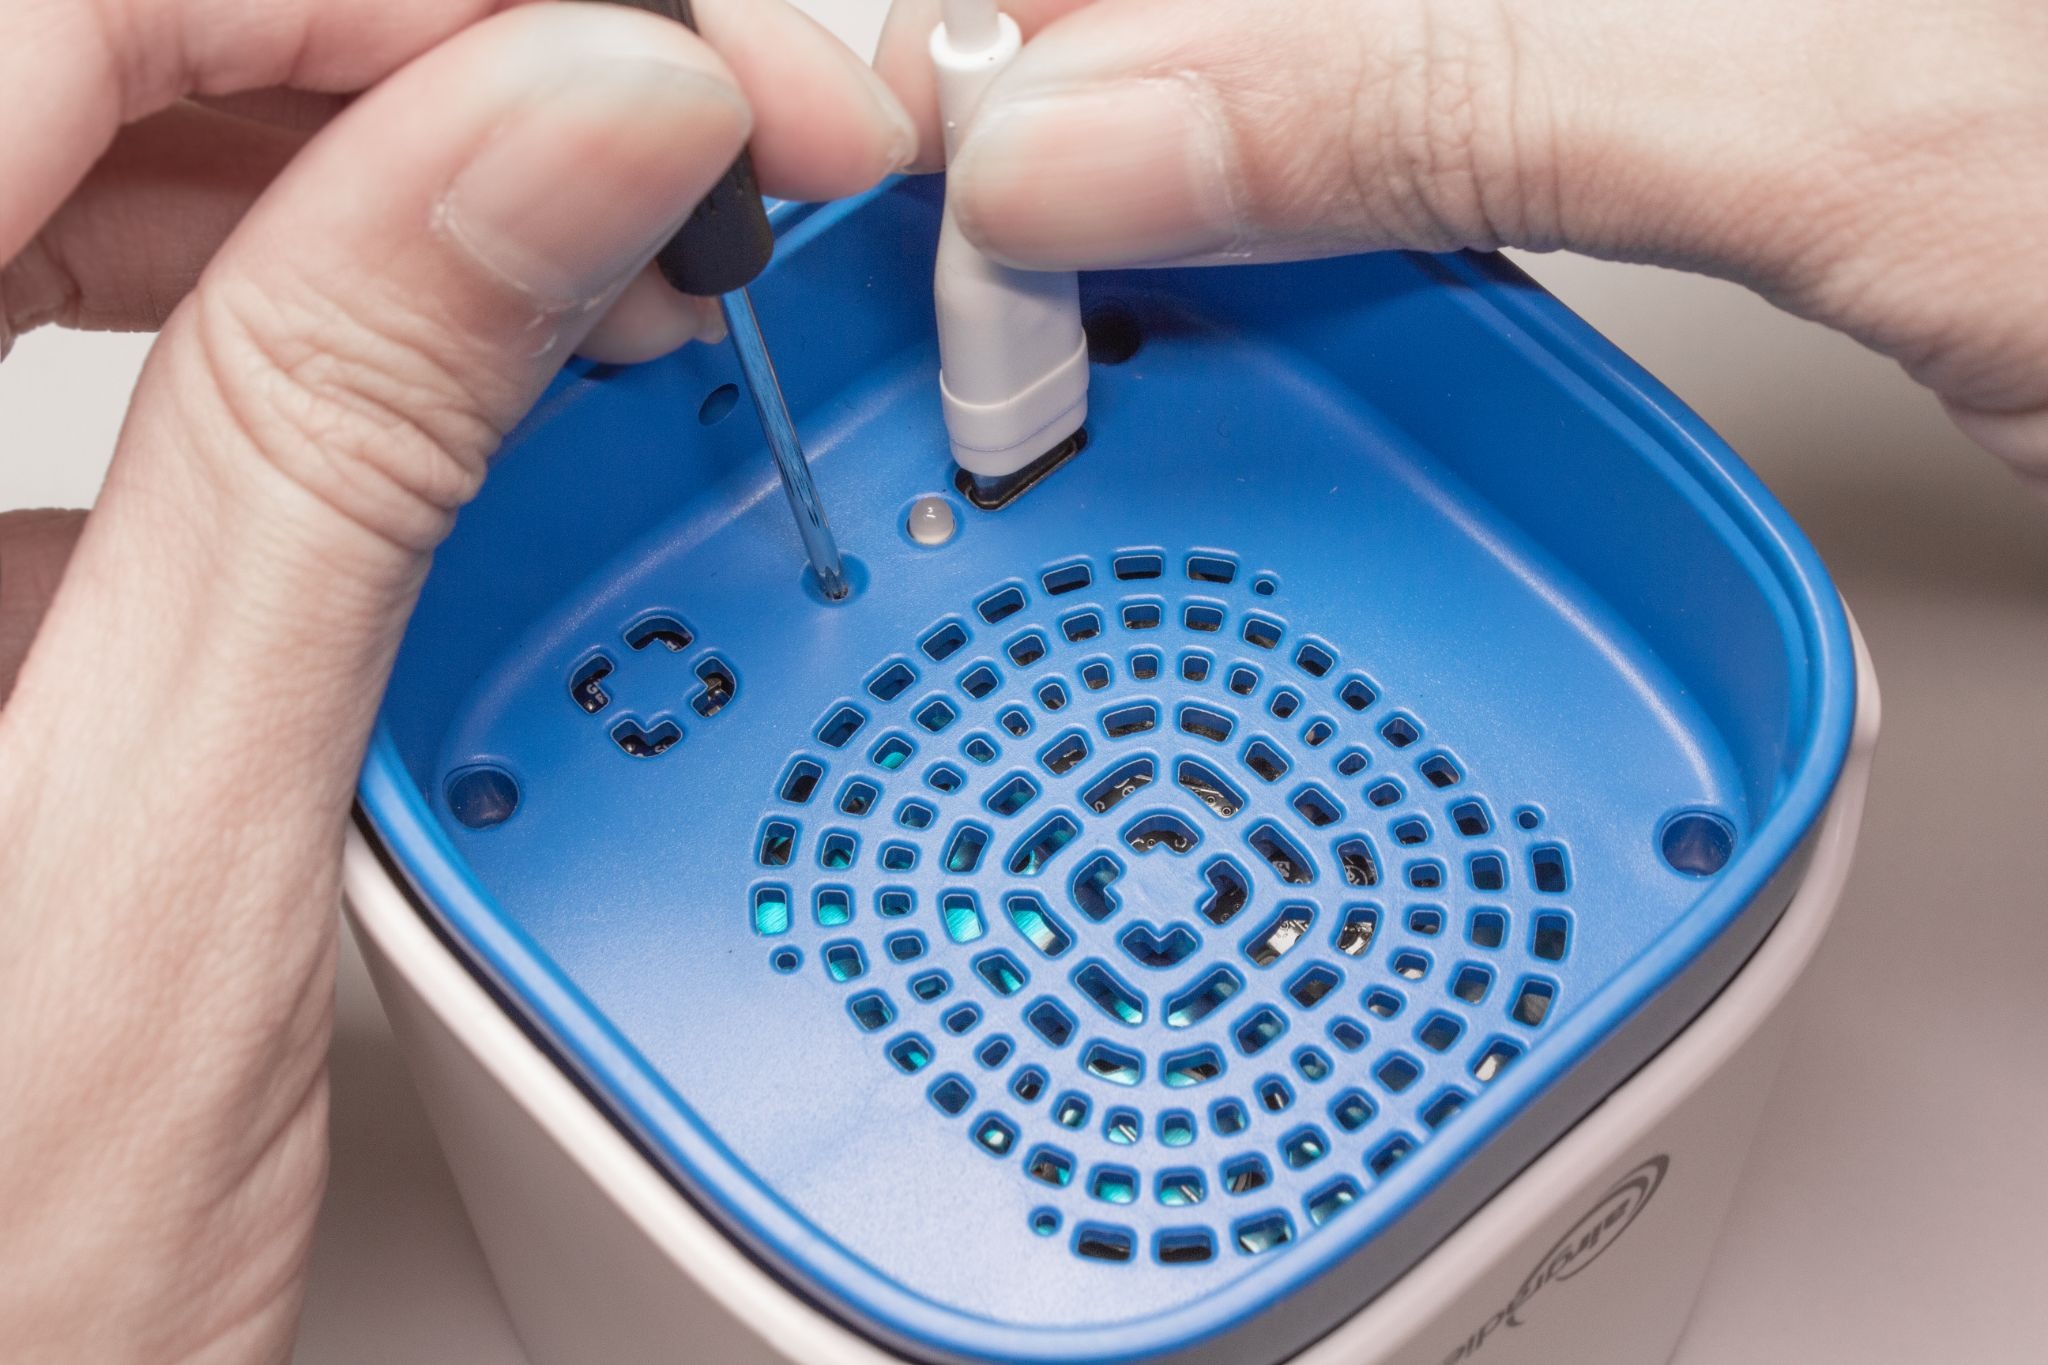
- While holding the BOOT button, plug in the USB-C cable:
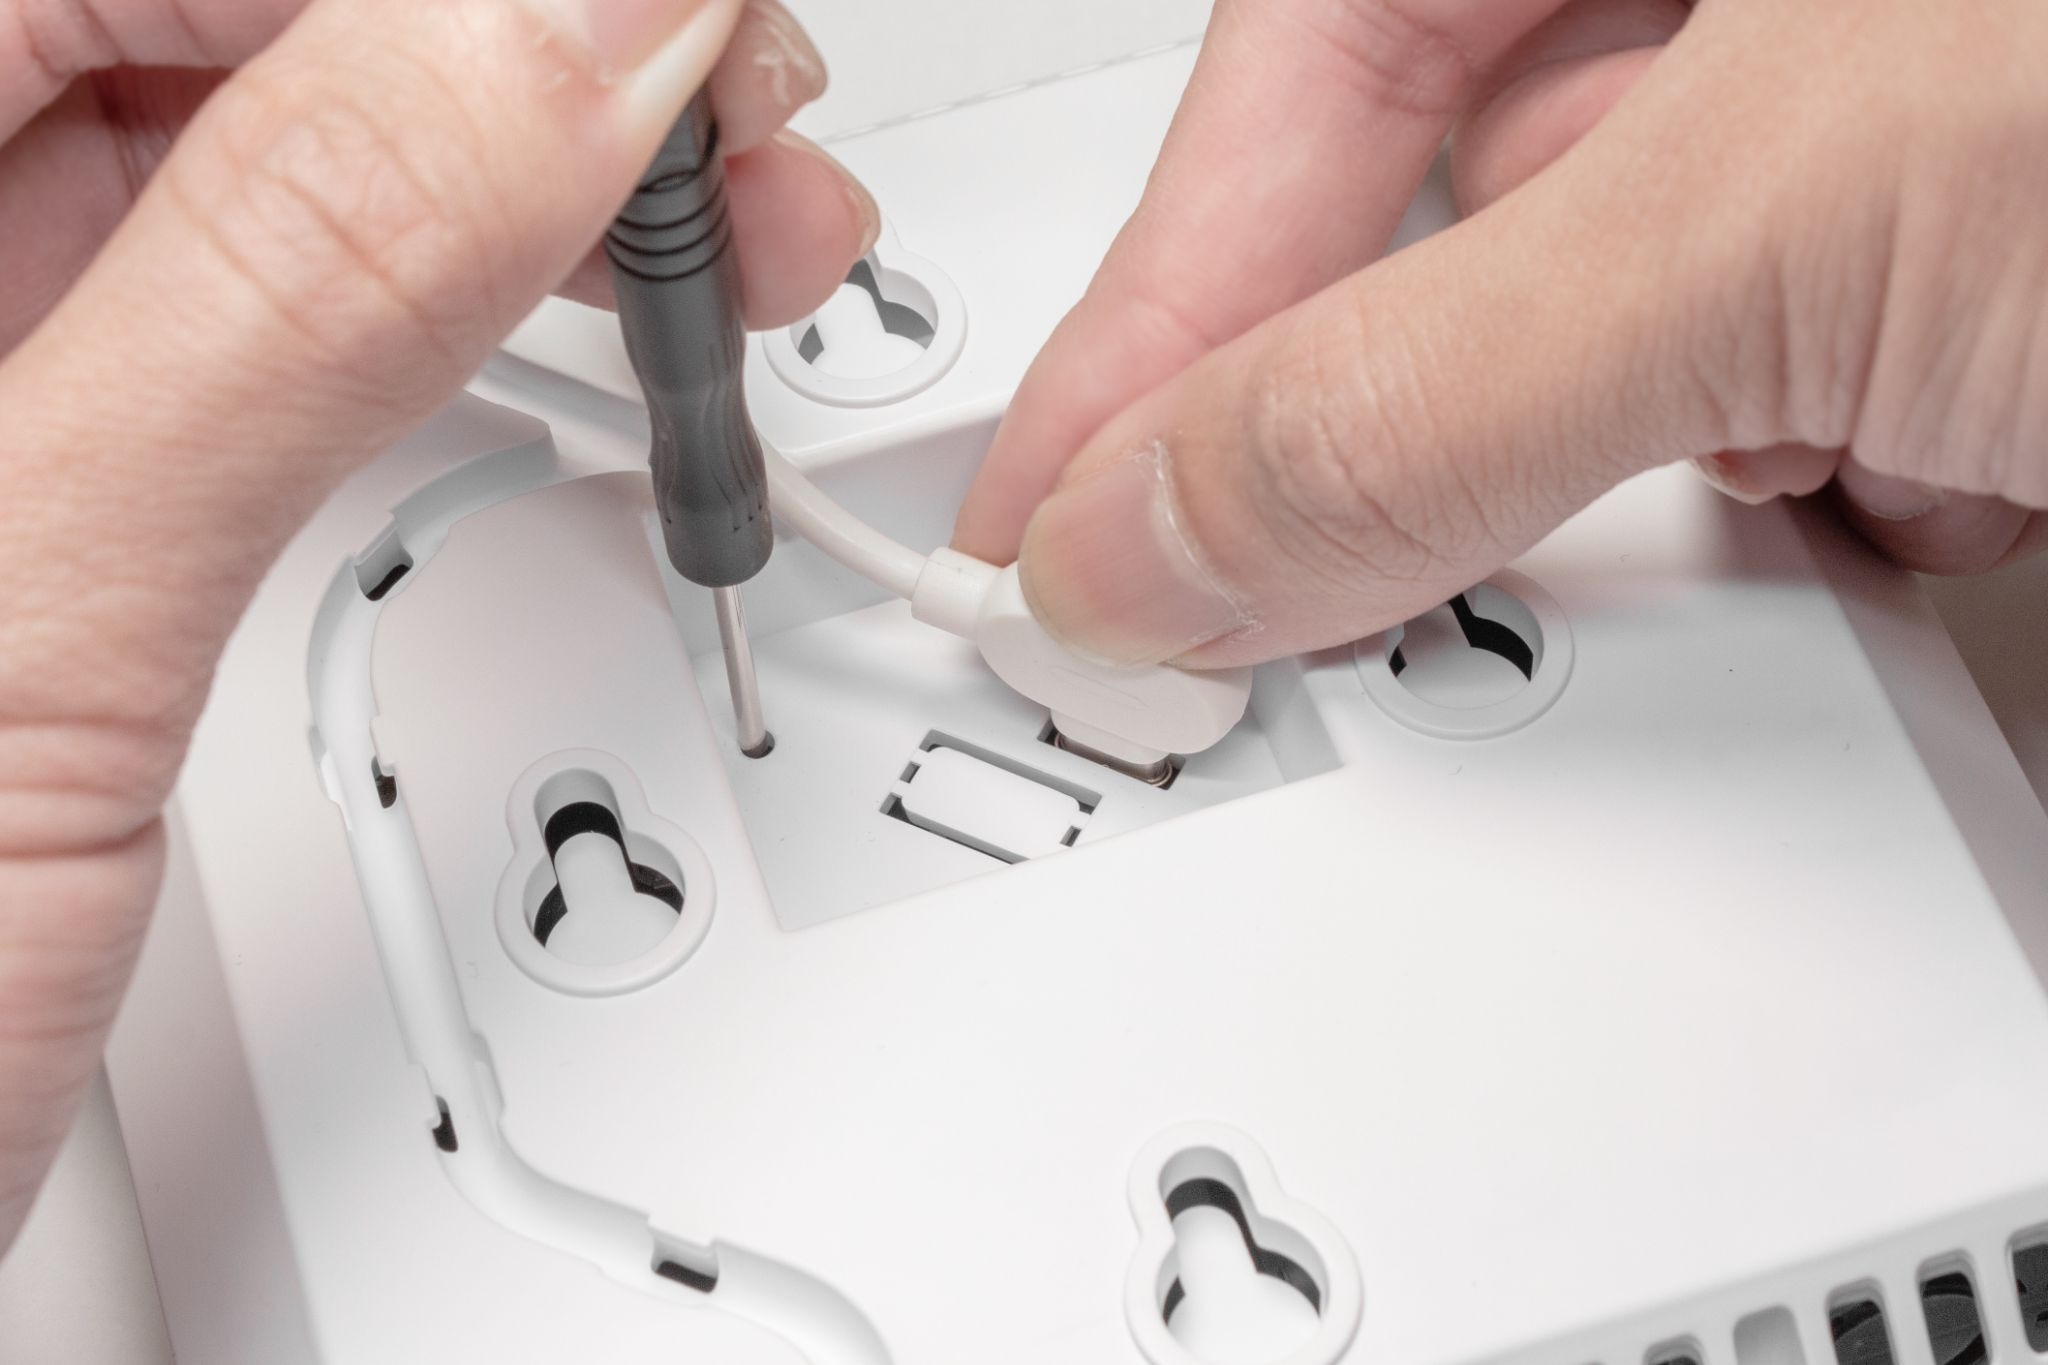
- Release the BOOT button AFTER the USB-C cable is plugged in.
Note: Ensure the correct sequence is followed:
Press and hold BOOT button → plug USB cable → release BOOT button.If done correctly, the device will appear off (no screen, no LEDs). This is normal.
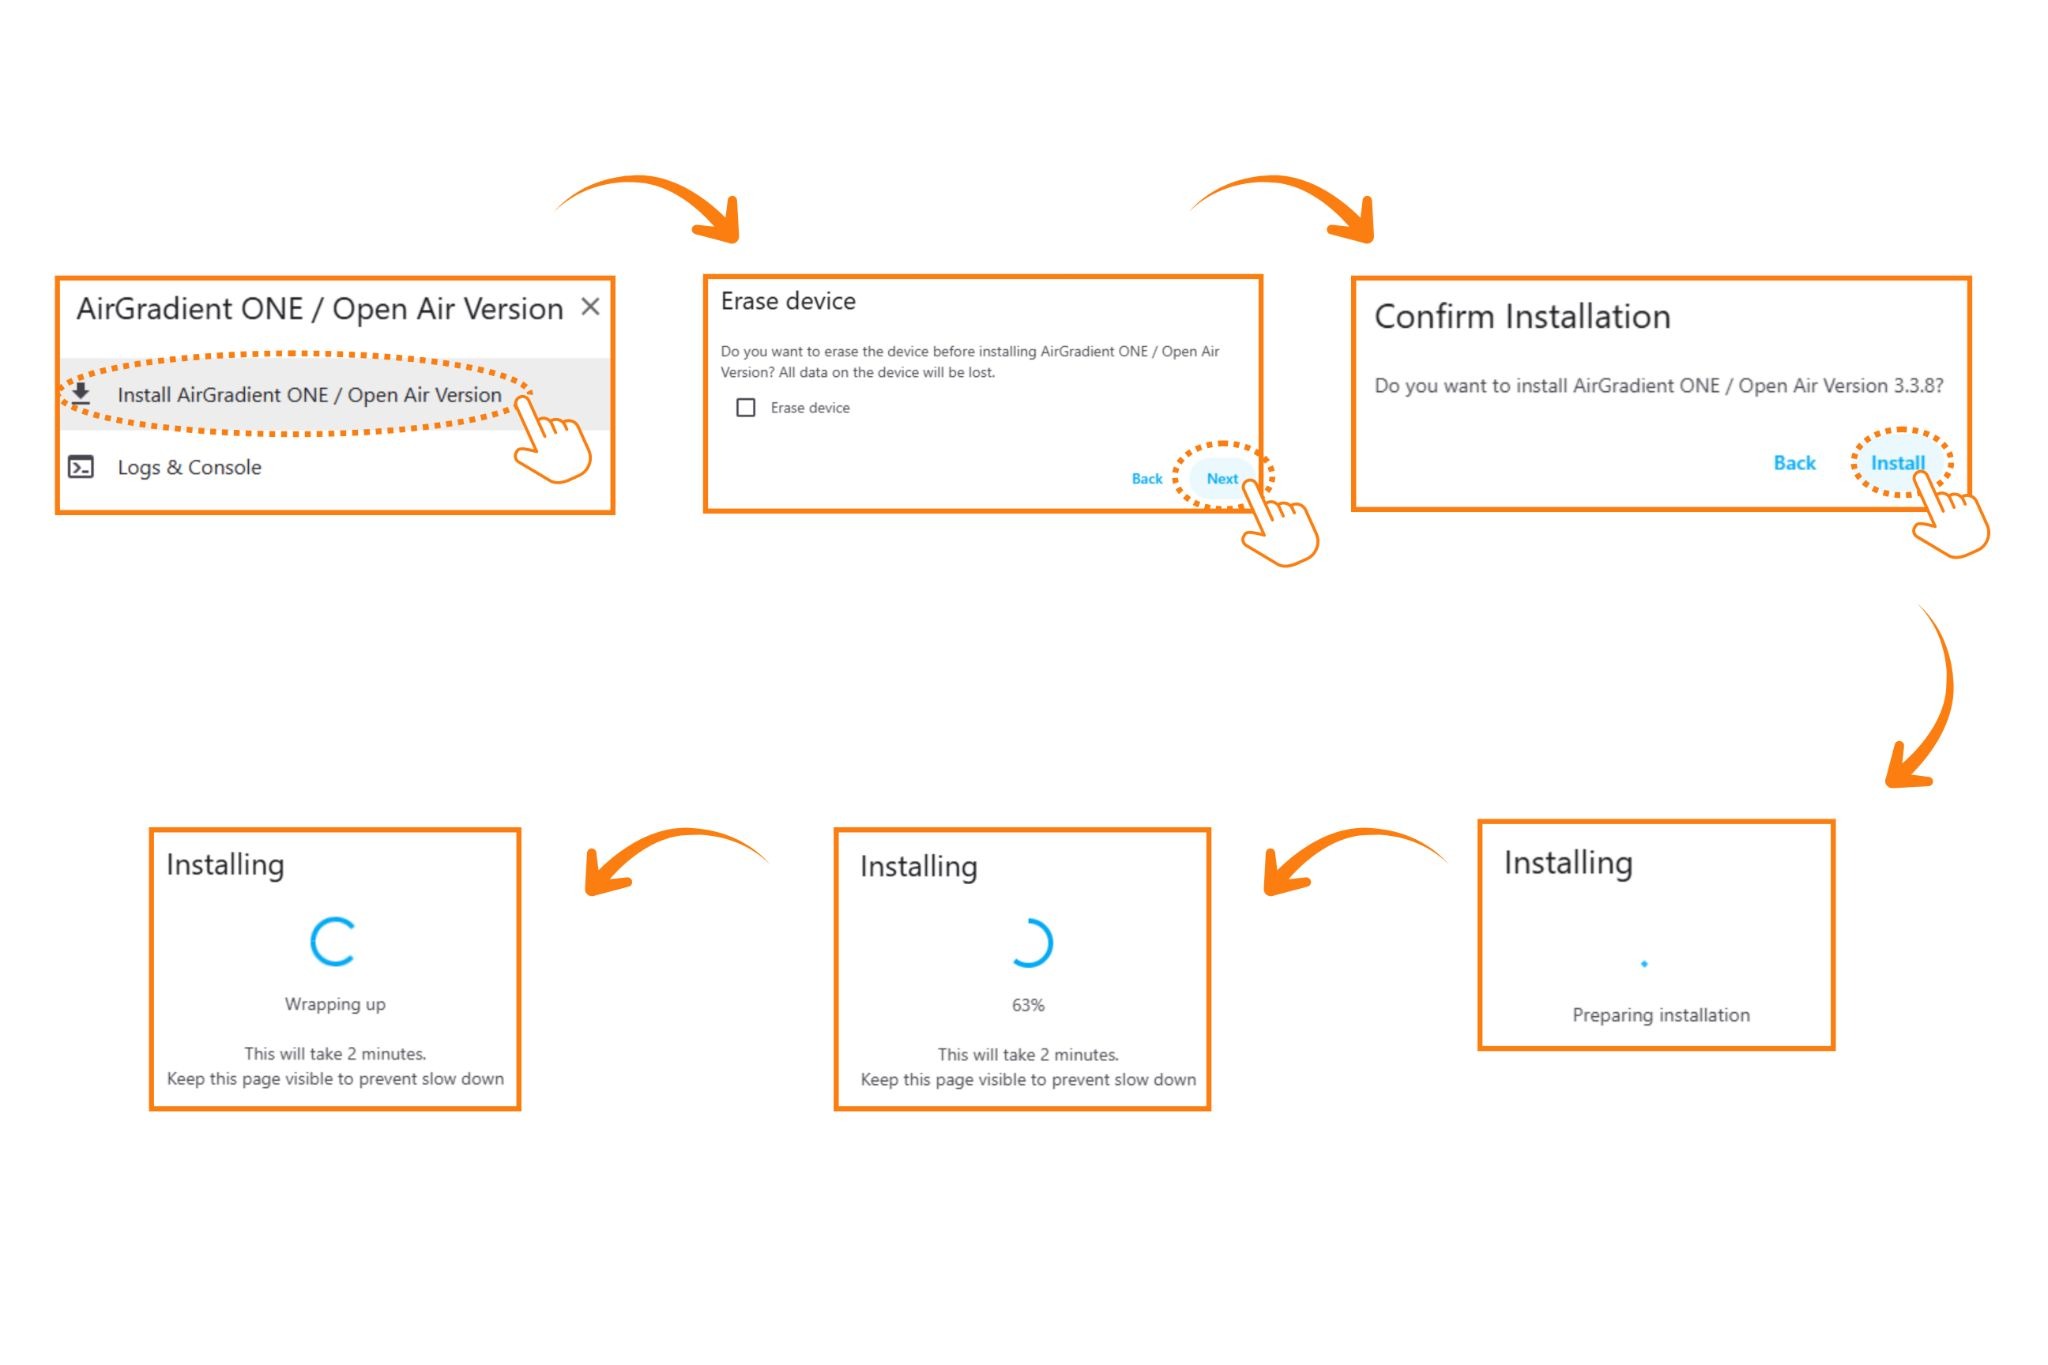
Step 2: Start the Flashing Tool
Click the button below:
A pop-up window will appear asking you to select the device.
If the blue “FLASH NOW” button above is not visible, this usually either means you’re accessing the webpage using a non-Chromium browser or the browser is blocking WebSerial. Try the following:
- Use Google Chrome, Microsoft Edge or any other Chromium- based browser.
(Safari and Firefox do not support WebSerial)
- Disable any script-blocking extensions (uBlock Origin, NoScript, etc.)
Step 3: Select Your Device Port
Choose the option named: USB JTAG / Serial Debug (or similar depending on your OS)
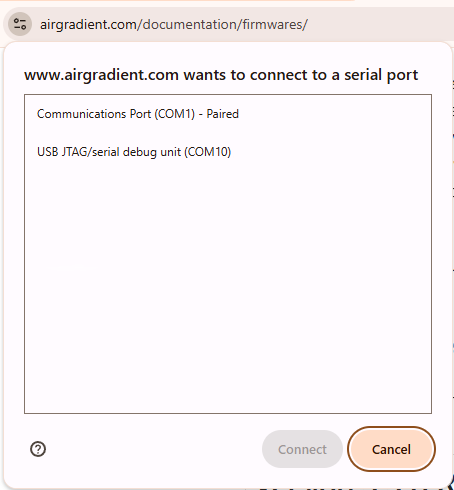
Click Connect.
(If any errors appear, see Troubleshooting section at the bottom of this page)
Step 4: Flash the Firmware
The flashing sequence will begin:

Do not disconnect the cable during this process.
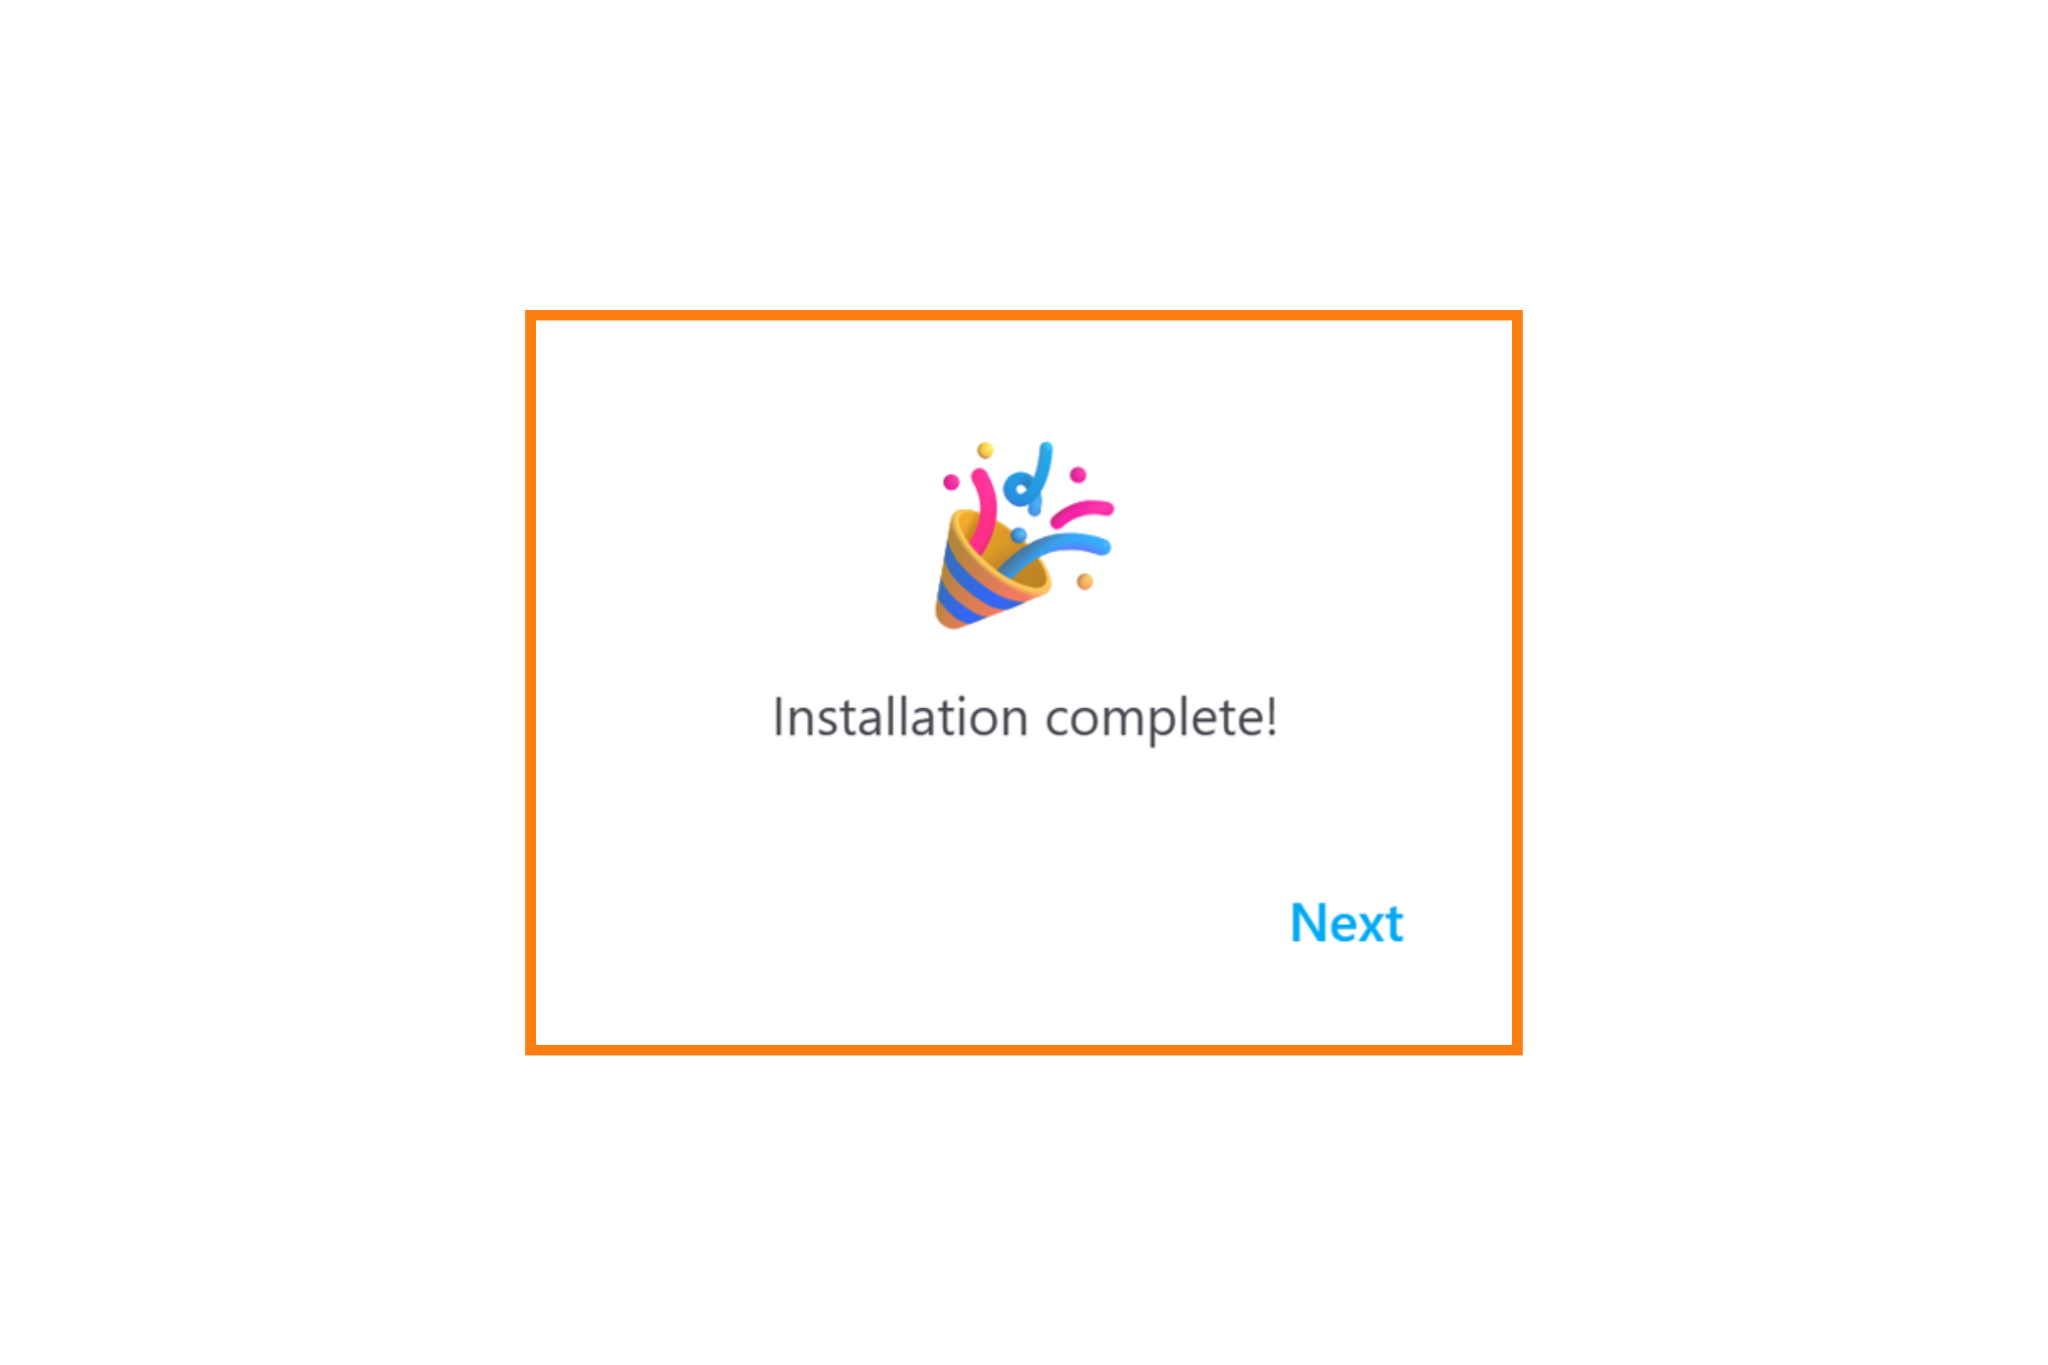
Once completed, the tool will show a success message.
Step 5: Restart the ONE
- Unplug the USB-C cable
- Wait 2–3 seconds
- Plug it back in normally
The device will now boot with the updated firmware.
AirGradient Open Air - Firmware Update
Everything you need to manually update the firmware on your AirGradient Open Air (O-1PST, O-1PST-CE, O-1PP, O-1PPT)
Video Guide: AirGradient Open Air - How to Flash Firmware
Before you begin, you need:
- A computer (Windows, macOS, Linux) with a supported browser.
Firmware flashing requires a Chromium-based browser. One of the following browsers will work:
- Google Chrome
- Microsoft Edge
- Chromium (Linux)
Note: The Flash button will NOT appear on Safari, Firefox, or any non-Chromium browser.
- A USB-C cable that supports data transfer (not charge-only). The cable that comes with the monitor will work.
- A tool (paperclip, toothpick, small screwdriver) that fits through the pin hole on the underside of the device to press the BOOT button.
Follow the steps below carefully to ensure a successful update.
Step 1: Enter Flash Mode
- Press and HOLD the BOOT button on the underside of the AirGradient Open Air:
- While holding the BOOT button, plug in the USB-C cable:
- Release the BOOT button AFTER the USB-C cable is plugged in.
Note: Ensure the correct sequence is followed:
Press and hold BOOT button → plug USB cable → release BOOT button.
If done correctly, the device will appear off (no LED indication).
Step 2: Start the Flashing Tool
Click the button below:
A pop-up window will appear asking you to select the device.
If the blue “FLASH NOW” button above is not visible, this usually either means you’re accessing the webpage using a non-Chromium browser or the browser is blocking WebSerial. Try the following:
- Use Google Chrome, Microsoft Edge or any other Chromium- based browser.
(Safari and Firefox do not support WebSerial)
- Disable any script-blocking extensions (uBlock Origin, NoScript, etc.)
Step 3: Select Your Device Port
Choose the option named: USB JTAG / Serial Debug (or similar depending on your OS)

Click Connect. (If any errors appear, see Troubleshooting section at the bottom of this page)
Step 4: Flash the Firmware
The flashing sequence will begin:
Do not disconnect the cable during this process.
Once completed, the tool will show a success message.

Step 5: Restart the device
- Unplug the USB-C cable
- Wait 2–3 seconds
- Plug it back in normally
The device will now boot with the updated firmware.
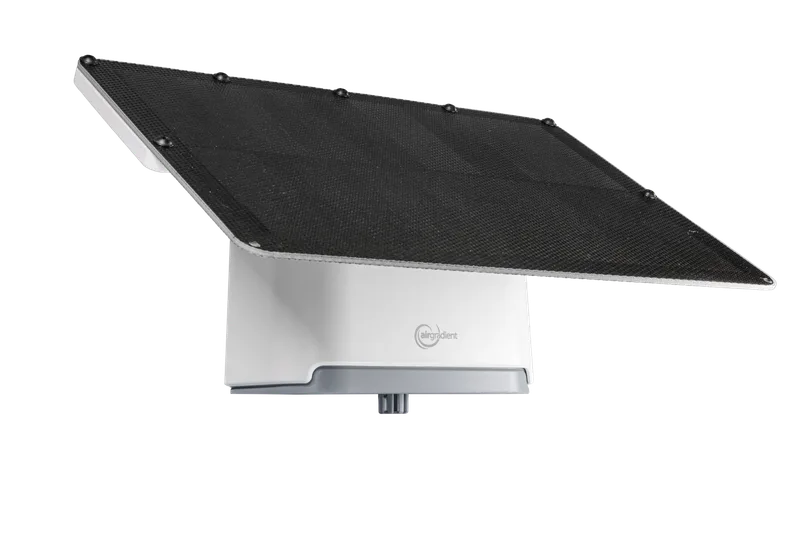
AirGradient Open Air Max - Firmware Update
Everything you need to manually update the firmware on your AirGradient Open Air Max (O-M-1PPST, O-M-1PPSTON).
Video Guide: AirGradient Open Air Max - How to Flash Firmware
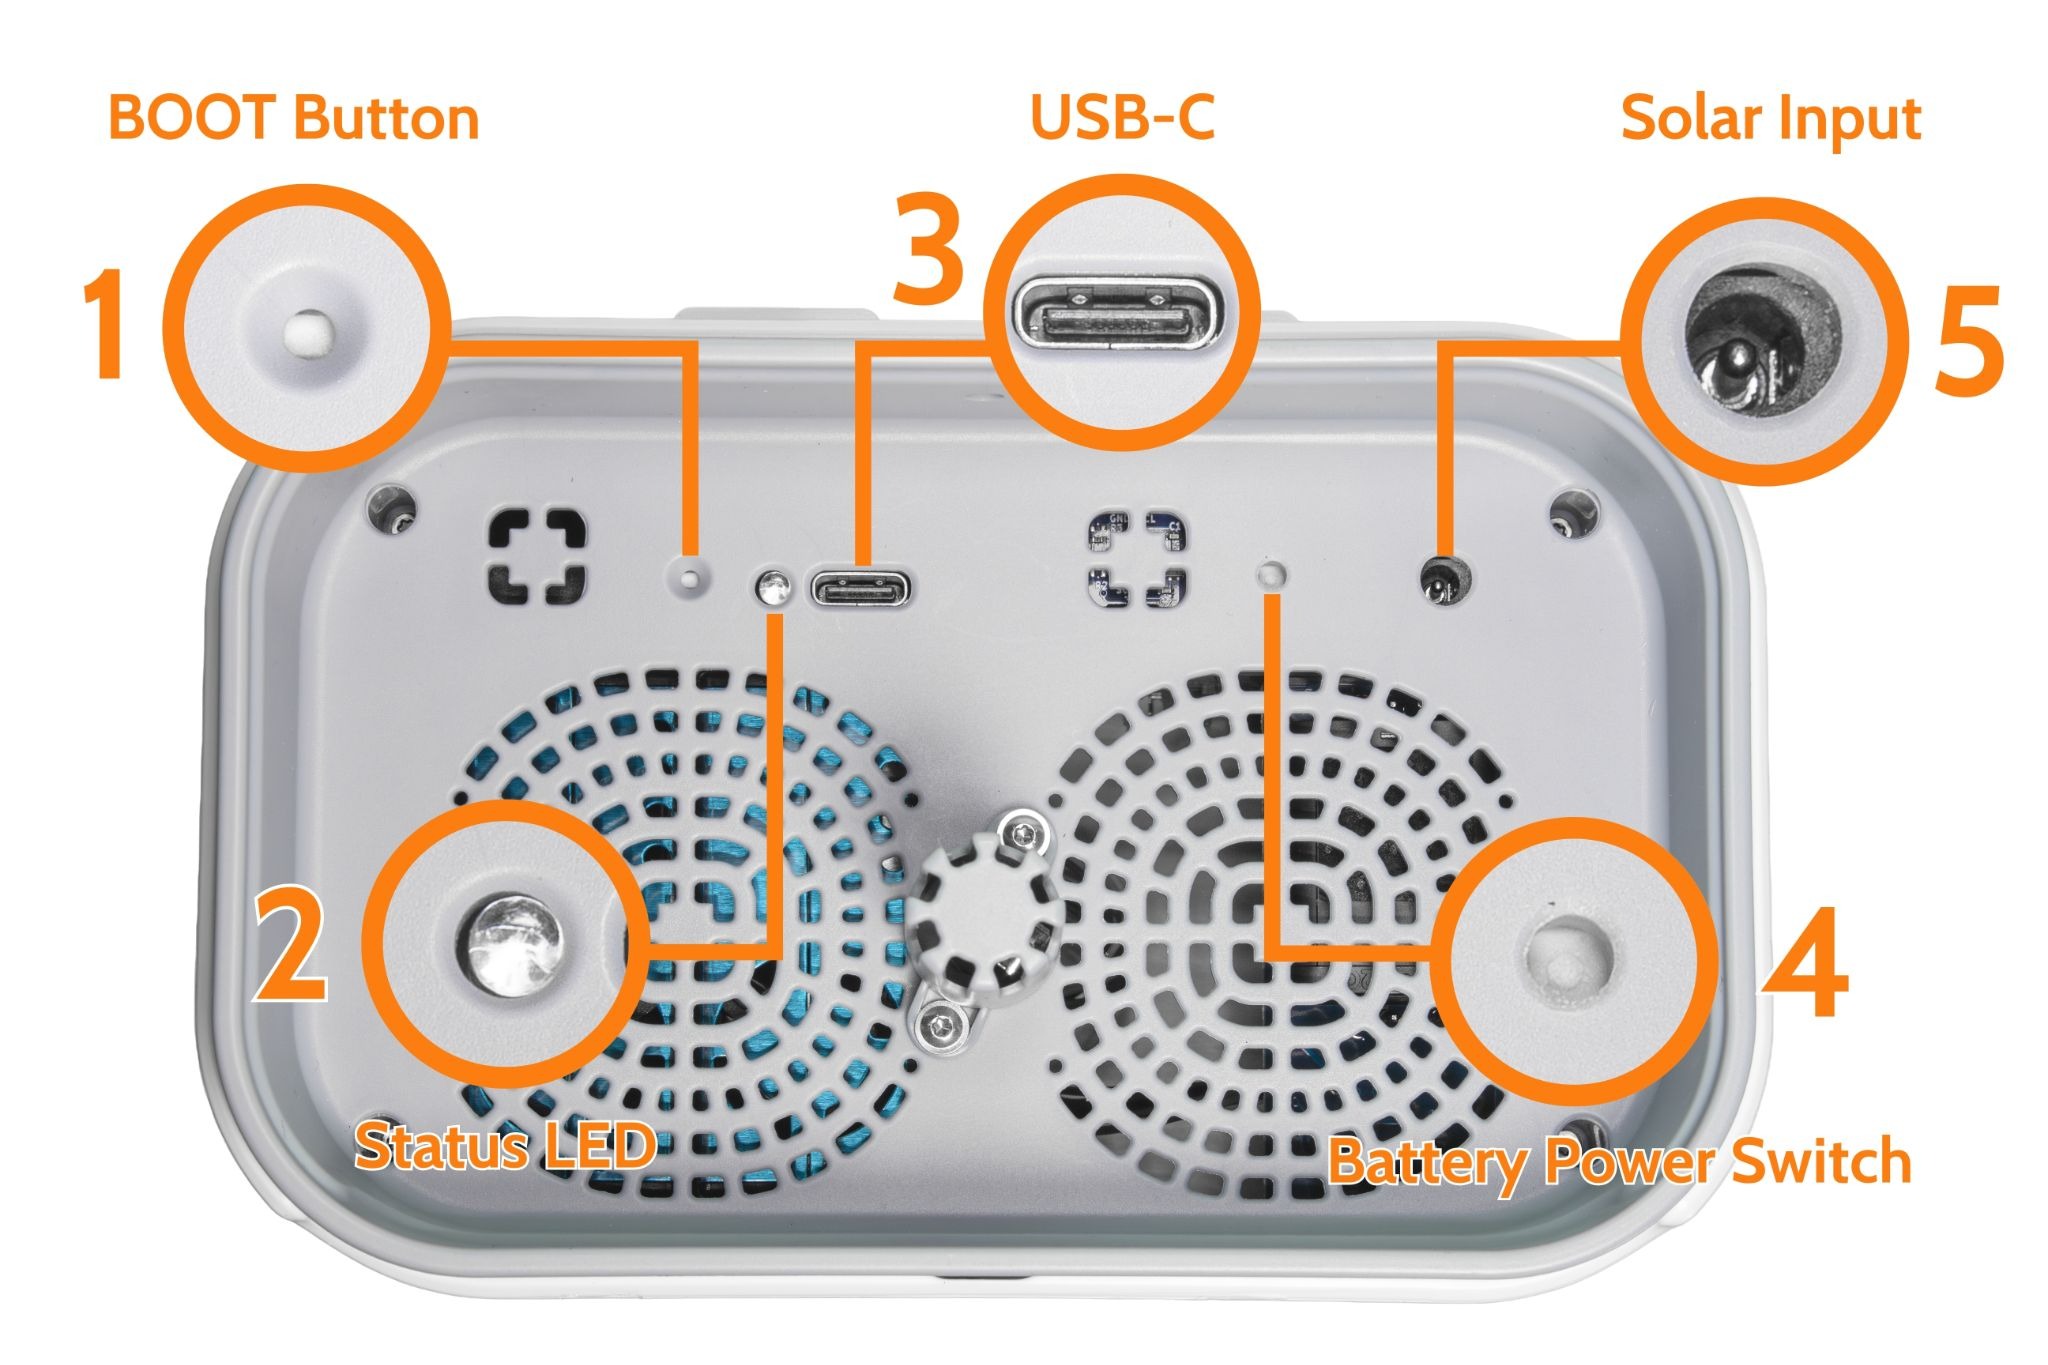
- BOOT Button, 2. Status LED, 3. USB-C, 4. Battery Power Switch, 5. Solar Input
Before you begin, you need:
- A computer (Windows, macOS, Linux) with a supported browser.
Firmware flashing requires a Chromium-based browser. One of the following browsers will work:
- Google Chrome
- Microsoft Edge
- Chromium (Linux)
Note: The Flash button will NOT appear on Safari, Firefox, or any non-Chromium browser.
- A USB-C cable that supports data transfer (not charge-only). The cable that comes with the monitor will work.
- A tool (paperclip, toothpick, small screwdriver) that fits through the pin hole on the underside of the device to press the BOOT button.
Follow the steps below carefully to ensure a successful update.
Step 1: Connect the monitor to a computer
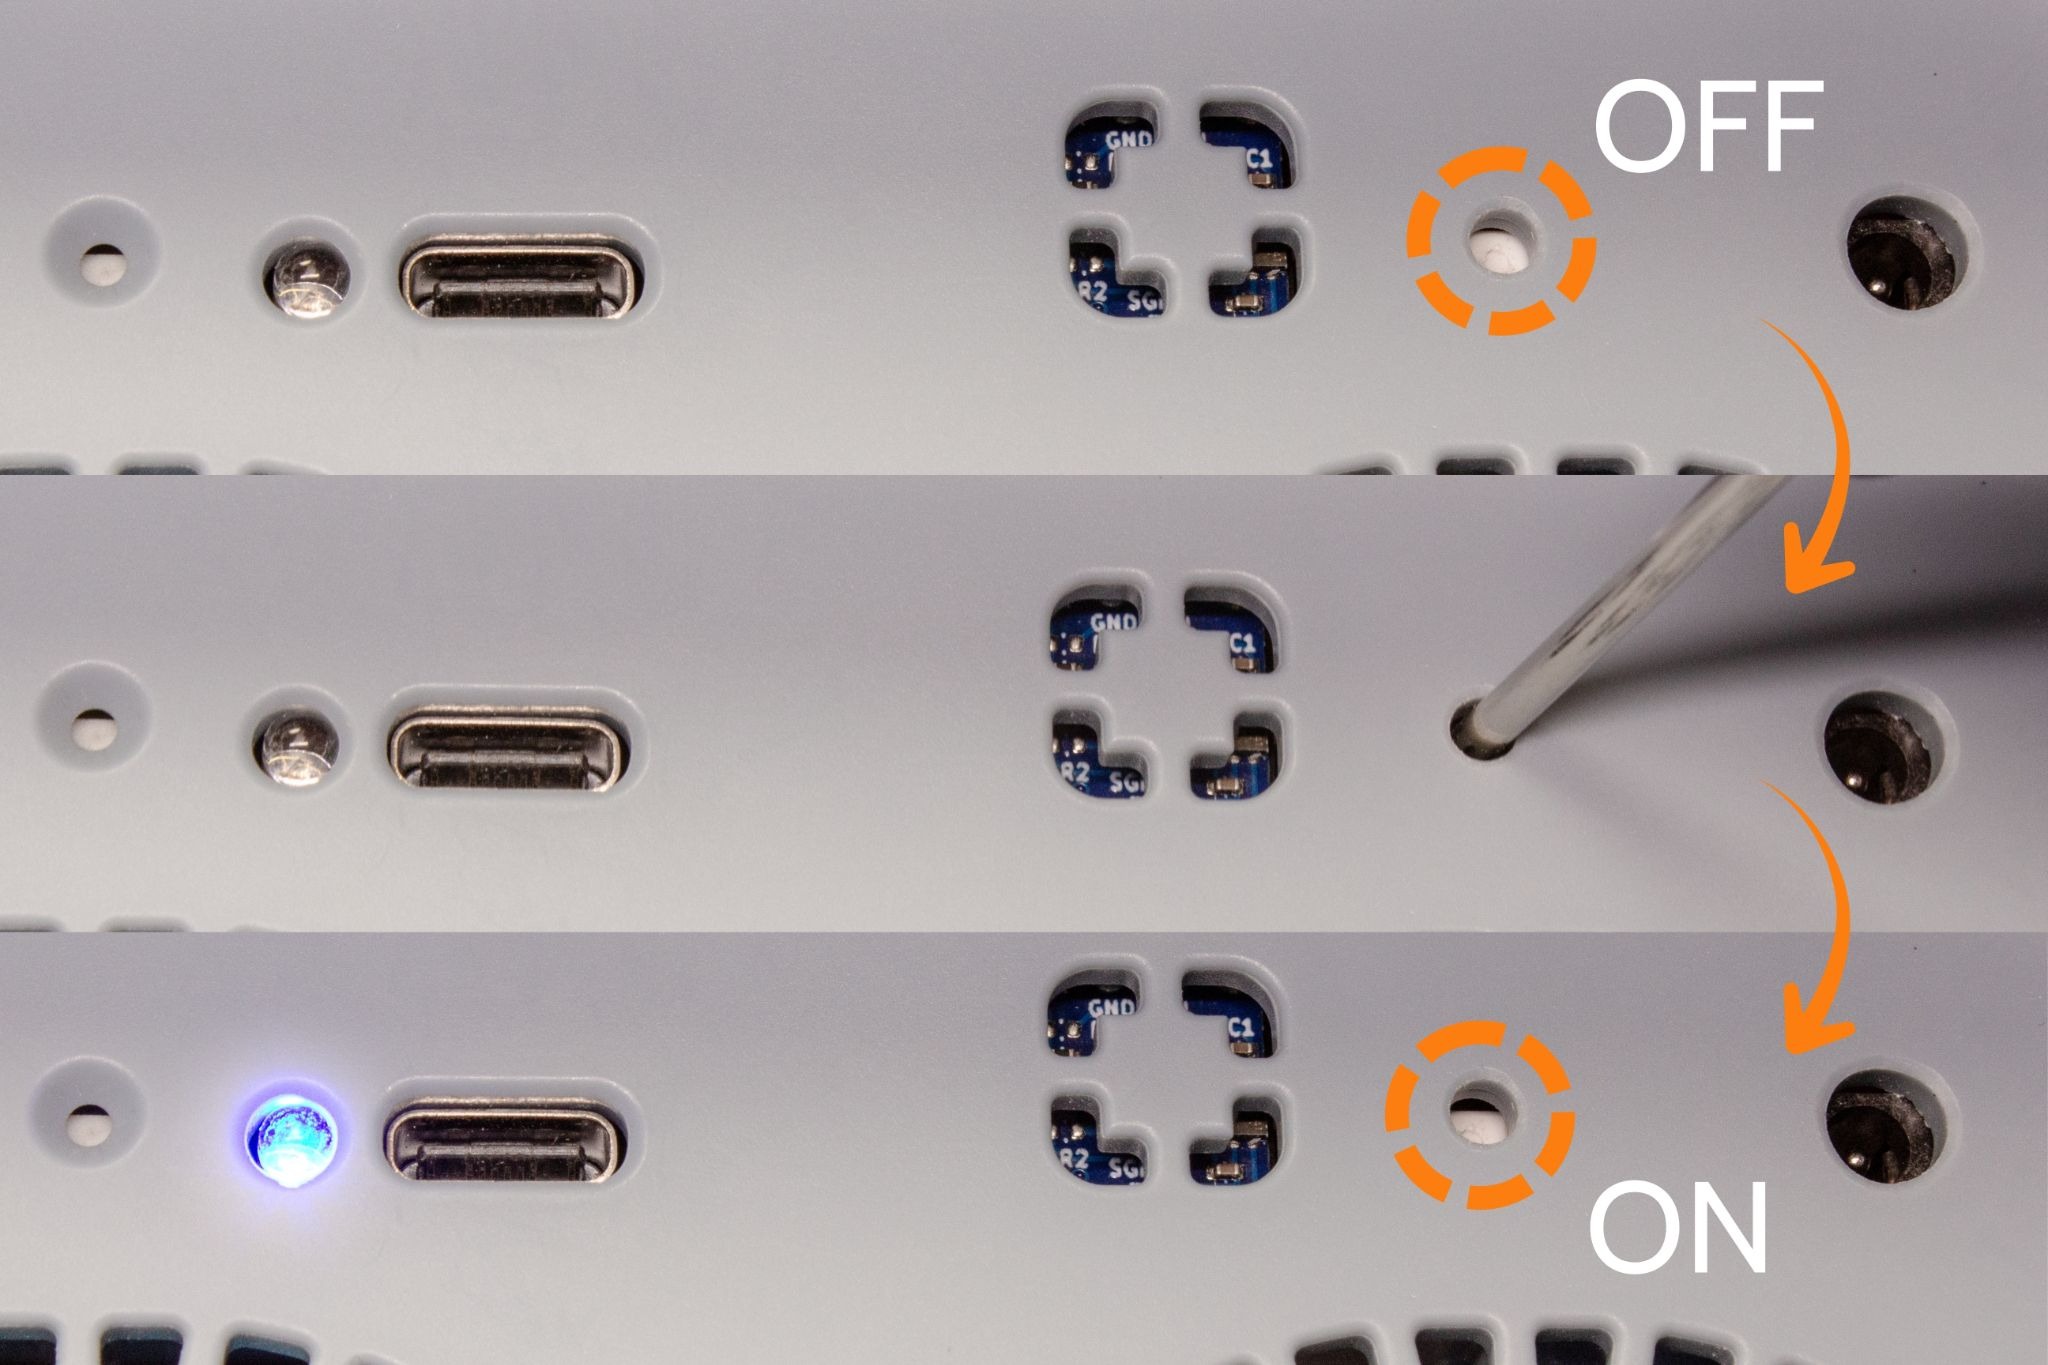
- Turn the Open Air Max ON by making sure the battery power switch is in the ON position (pushed in). If the monitor was already ON, turn it off first then turn it back ON.
- Connect the Open Air Max to your computer.
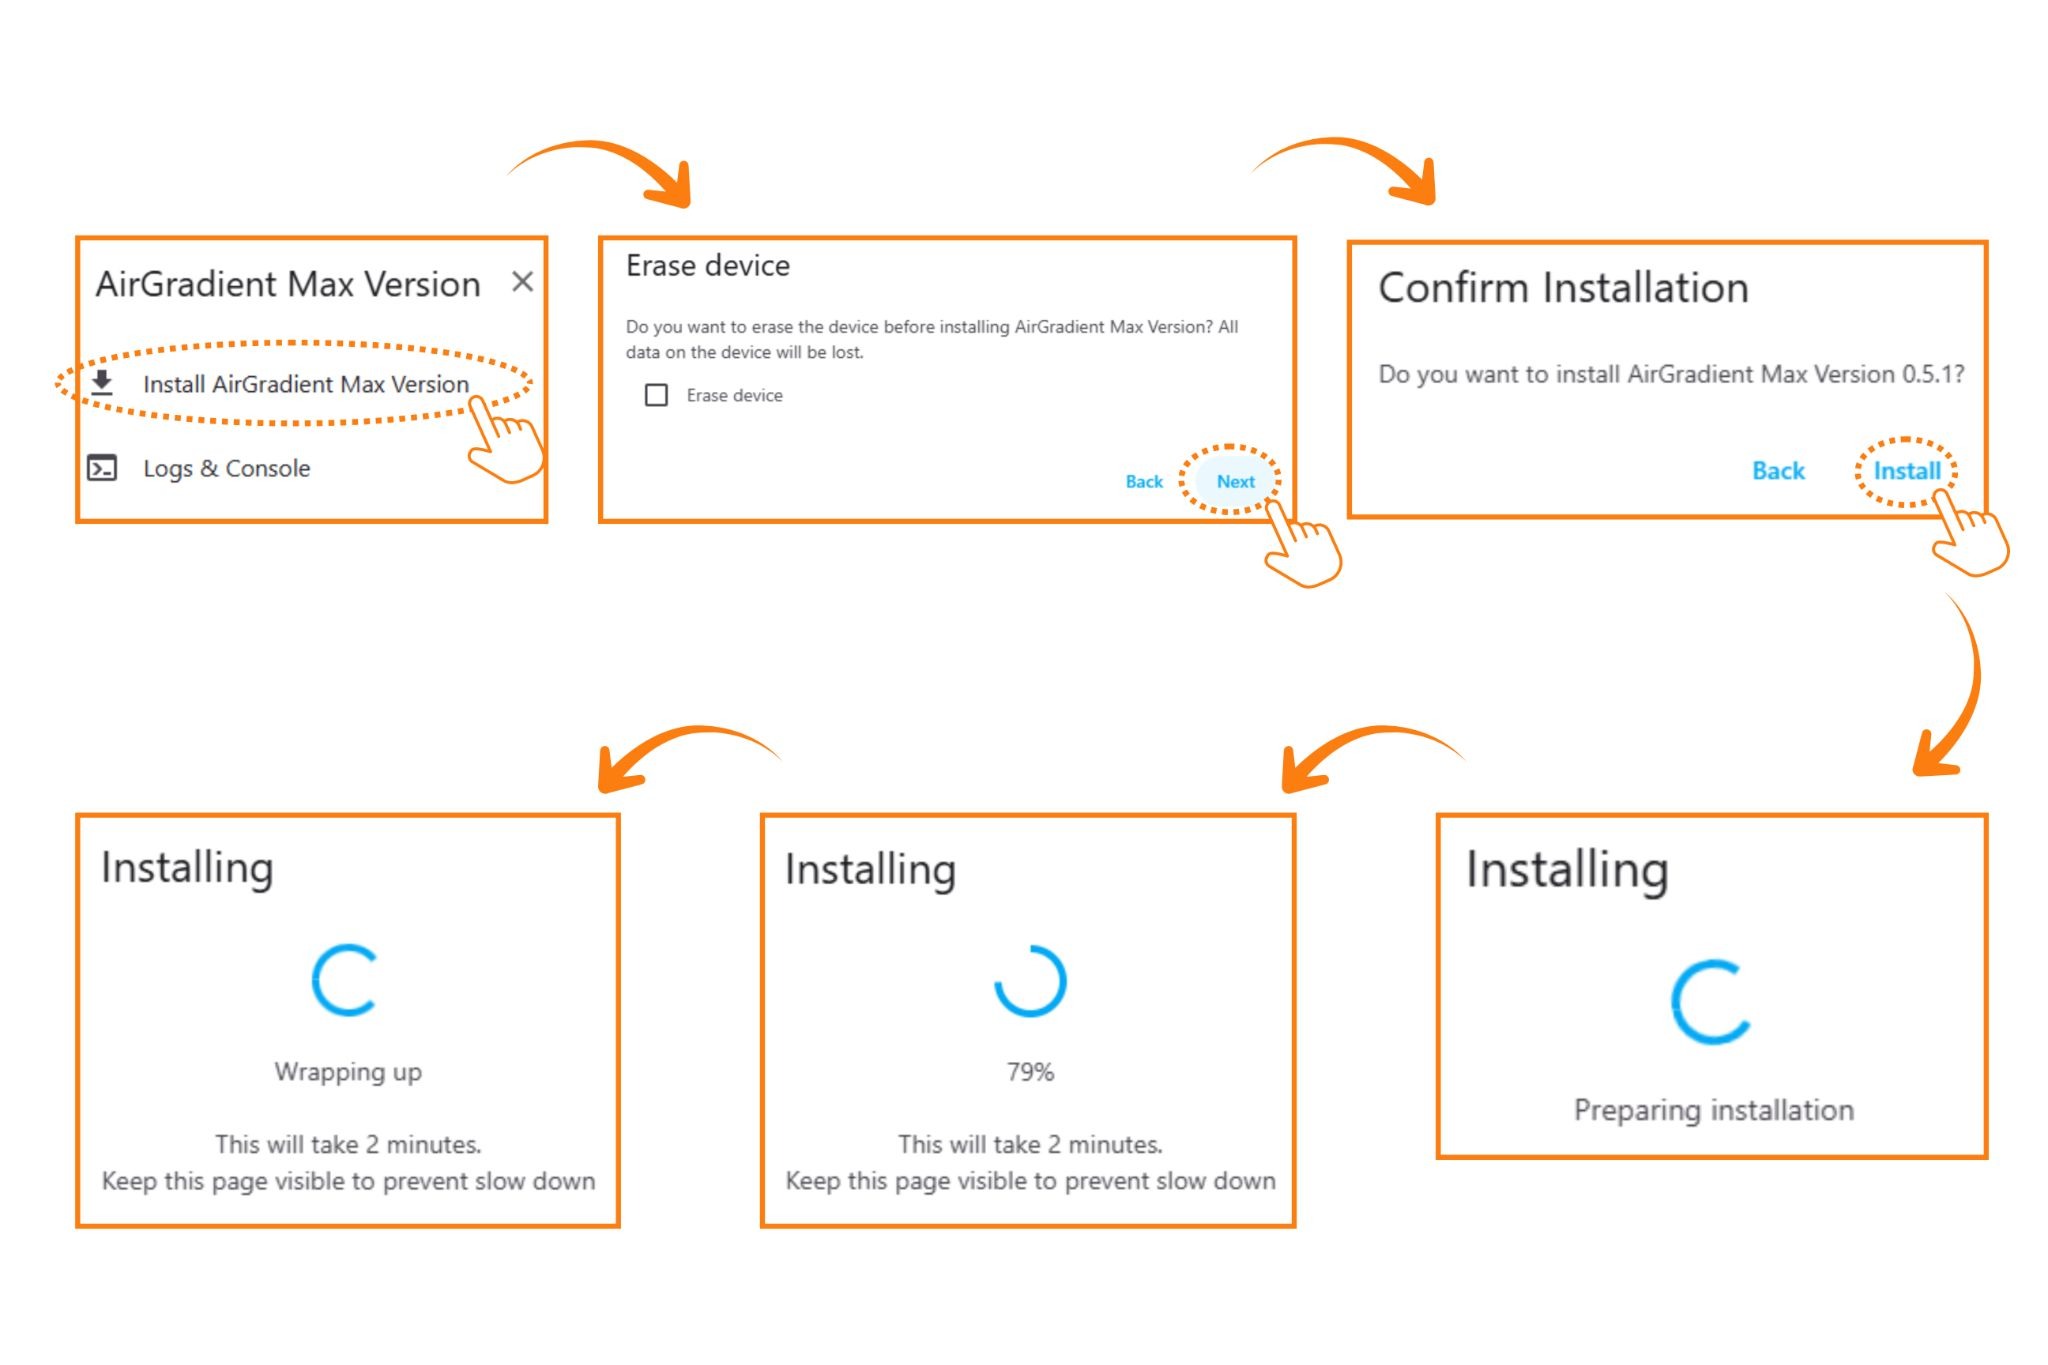
Step 2: Start the Flashing Tool
Click the button below:
|
|
A pop-up window will appear asking you to select the device.
If the blue “FLASH NOW” button above is not visible, this usually either means you’re accessing the webpage using a non-Chromium browser or the browser is blocking WebSerial. Try the following:
- Use Google Chrome, Microsoft Edge or any other Chromium- based browser.
(Safari and Firefox do not support WebSerial)
- Disable any script-blocking extensions (uBlock Origin, NoScript, etc.)
Step 3: Select Your Device Port
Choose the option named: USB JTAG / Serial Debug (or similar depending on your OS)

Click Connect. (If any errors appear, see Troubleshooting section at the bottom of this page)
Step 4: Flash the Firmware
The flashing sequence will begin:
Do not disconnect the cable during this process.
Once completed, the tool will show a success message.

The device firmware has now been updated.
Troubleshooting
Port Not Visible
If the USB JTAG / Serial Debug serial port does not show up in the flashing pop-up, try the following:
- Replace the USB-C cable. Charge-only cables will not work.
- Try a different USB port
- Close any other serial applications such as Arduino IDE, PlatformIO, Terminal sessions, etc. that may be using ports.
- Repeat the flashing sequence.
- Restart your computer. This resets all USB/serial bindings and can resolve rare driver lockups.
“Failed to execute 'open' on 'SerialPort'”
If you see this error while flashing, the browser cannot open a connection to the device. Try the following:
If you see this error while flashing, the browser can see the serial port but cannot open a connection to the device.
First try the following:
- Unplug the USB-C cable and plug it back in.
- Repeat the flash mode sequence carefully: hold the BOOT button, plug in USB, then release the BOOT button a few seconds after the USB cable is connected.
- Close other serial applications such as Arduino IDE, PlatformIO, Terminal sessions, or serial monitors.
- Try a different USB port, preferably one directly on your computer instead of a USB hub.
- Restart your computer, then try again.
- Make sure you are using Google Chrome, Microsoft Edge, or another Chromium-based browser.
Linux notes
On Linux, this issue can also be caused by missing USB or serial permissions.
If you use Chromium installed via Snap and the serial port window shows “No compatible devices found”, run:
sudo snap connect chromium:raw-usb
Then log out and log back in, or restart your computer. If you use Google Chrome on Linux and you can select the serial port but clicking Connect shows:
Failed to execute 'open' on 'SerialPort': Failed to open serial port.
Run:
sudo usermod -a -G dialout <your_username>
Replace with your Linux username. Then log out and log back in, or restart your computer.
If the issue persists after these steps, try a different computer to rule out a local USB, browser, or driver issue.
Logging
If you just need a debug log from the monitor, follow the instructions here: Online Debug
Resources
- AirGradient GitHub /arduino (ONE/Open Air Firmware)
- AirGradient GitHub /openair-max (Open Air Max Firmware)
- AirGradient Forum
Repository & Bug Reports
The open-source code firmware for AirGradient ONE & AirGradient Open Air is accessible on AirGradient GitHub /arduino. For AirGradient Open Air Max, visit AirGradient GitHub /openair-max. Please submit issues directly there.
Feature Discussions
For more general feature discussions, please use the AirGradient Forum.