The AirGradient DIY CO2 Traffic Light
The AirGradient DIY CO2 Traffic Light
As part of the AirGradient for Education series, this instruction teaches how to build an accurate CO2 traffic light that can be connected easily to data platforms.
CO2 traffic lights are often used in classrooms around the world as an indicator when it is important to ventilate the classrooms to reduce the COVID-19 transmission risk. So this built especially addresses the needs for schools and enables them to build a powerful, accurate CO2 traffic light for a much less cost than commercial sensors (that often do not even have WiFi capabilities).
This build uses the Senseair S8 NDIR CO2 sensor that has a high accuracy and is also used in much more expensive professional grade sensors.
We offer schools who buy our CO2 traffic light kit, one year premium access to our powerful AirGradient platform made especially for schools.
The build also comes with 3D printable files of a professionally designed enclosure. This build also uses our standard AirGradient PCB. More information below.
Skills and Equipment required
For this project you should be familiar with the following:
- Basic soldering skills. Both the D1 mini microprocessor and some of the components we use like the CO2 sensor need to get the pins soldered onto it. It is not very difficult and you can learn it easily. Look for example on this tutorial.
- Soldering iron and solder for above
- A breadboard is helpful to fix the components during soldering
- A computer (Linux, Mac, or Windows) with the Arduino IDE installed to flash the software onto the D1 mini.
- A micro USB data cable and charger to connect the D1 Mini to the computer for flashing and later for electricity. IMPORTANT: Many micro USB cables only provide charging but do not allow the data transfer for flashing. So please make sure you have a micro USB DATA cable.
Components:
- Wemos D1 Mini
- Senseair S8 CO2 Sensor
- 8x8 LED matrix
- 10cm 3pin low voltage cable to connect the LED matrix to the board
AliExpress might not ship to all countries. In case they do not ship to your country, please try and source the exact same component from elsewhere.
Make your own PCBs
The CO2 traffic light uses the same PCB that we also use for our standard DIY air quality sensor.
In case you want to make your own you can use our Gerber files .
Alternatively, you can open the PCB schematic in the Easyeda editor and order additional PCBs from there.
Arduino Software Instructions and flashing of the D1 Mini with the AirGradient firmware
All software for the AirGradient DIY CO2 traffic light is open source and you are free to use it in any way. For flashing the D1 Mini microcontroller with the firmware we will be using the well-known Arduino software. Please read the following blog post on how to install the Arduino software and also on how to install the D1 Mini board and the AirGradient Arduino library.
AirGradient Arduino Software Setup Instructions
Flashing of the D1 Mini with the AirGradient firmware
Once you have the Arduino Software setup for the D1 Mini, you can flash it with the AirGradient firmware.
- Go to Tools, Manage Libraries, and then search for AirGradient and install the library.
- Go to Tools, Manage Libraries, and then search for Adafruit NeoPixel Library and install the library. Please also install the dependent libraries when asked.
- Once it is installed, download an open this code file.
- Then flash this code the same way you flashed the BLINK example
- Once you have successfully uploaded the code you can continue building the hardware
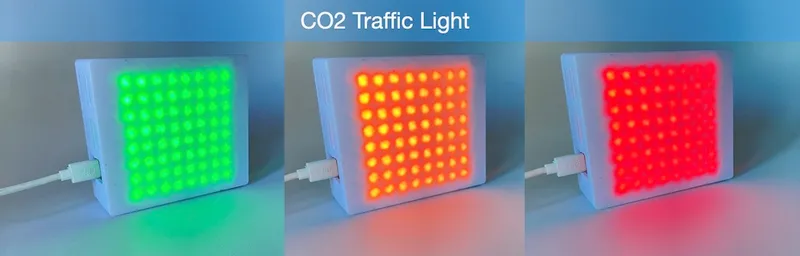
Adjusting the CO2 traffic light color bands
You can easily adjust at what levels of CO2, which color should be displayed. Just adjust the values in the code block that looks like below.
if (CO2 > 1200) {
showColor("red");
} else if (CO2 > 800) {
showColor("orange");
} else {
showColor("green");
}
The default is green <=800ppm CO2, yellow between 800 and 1200 ppm and red above 1200.

Soldering the Components
Now that you have the firmware flashed, you can solder the components onto the PCB. Please make sure you solder the pins in the correct direction. We recommend you start in the following order:
Wemos D1 Mini Soldering
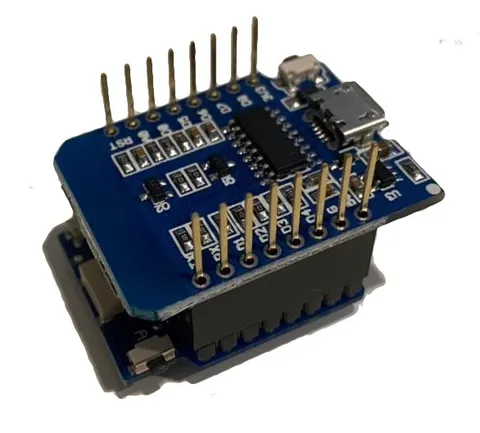
Put the long female and male pins through the D1 Mini. Make sure that the female parts are on top of the D1 Mini as shown on this image:
Wemos D1 Mini Soldering onto PCB
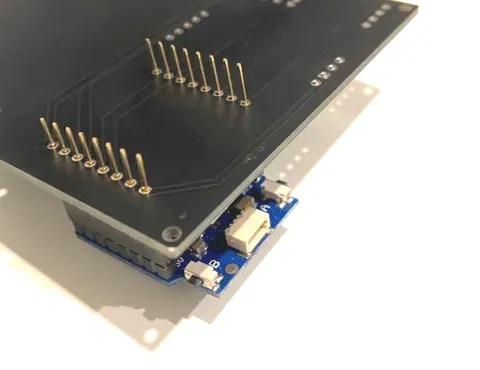
The next step is to solder the D1 Mini onto the PCB. Please make sure you solder it the correct way. The micro USB port needs to face outwards. You can also compare the PIN labels on the PCB with the ones on the D1 Mini.
You can either solder the D1 Mini directly onto the PCB or use the pin headers as a socket. If you solder it directly, please leave a small gap between the PCB and the D1 Mini to make sure the plug is accessible.
Important. If you use the display or RGB led shield, you need to solder the D1 Mini directly on the PCB without the pin headers as a socket as otherwise it becomes too high and does not fit the enclosure.
Now depending on what sensor modules you want to use, please proceed as below.
Soldering the Sensirion S8 Module (CO2 Sensor)
To solder the small pins onto the S8 module, you can use a breadboard again to fix it into place.
Please make sure that the PINS face downwards as can be seen on this image.
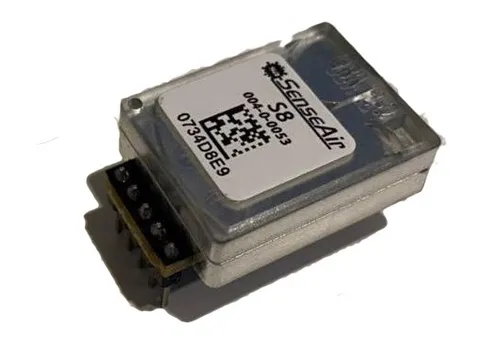
Then solder the CO2 sensor onto the PCB. It is important that the bottom side of the CO2 has enough air flow. So make sure the gap is sufficient. It might be a good idea to put it on a female pin socket but you can also solder it directly. You can use the pin that came with the D1 Mini but you need to cut them off to the required length.
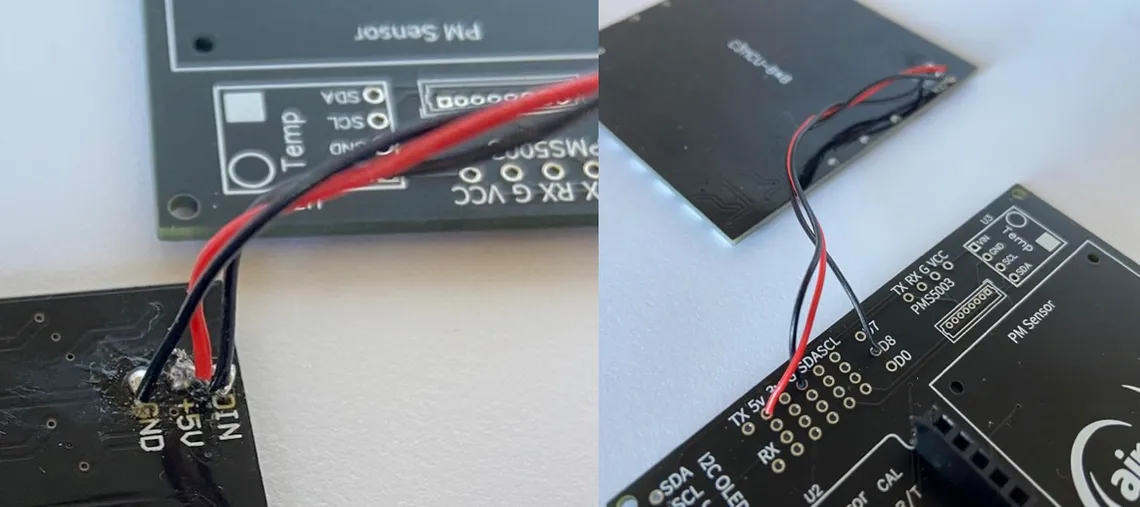
Connecting the LED matrix to the board
Take a 3 wire low voltage cable, around 10cm. Solder one part to the LED matrix. Important please make sure you soldet it to the pins labelled DIN.
Then solder the other end of the cable to the through holes of the board.
Please ensure that you connected the cables the following:
| AirGradient PCB | LED Matrix |
|---|---|
| 5v | +5V |
| G | GND |
| D8 | DIN |
Power plug
Please make sure you use a powerful USB power plug as the LEDs need quite a bit of power and using a non-adequate power supply might lead to unstable operation.
Done & Enjoy
That's all and you can now connect the AirGradient DIY CO2 Traffic Light with power and after a short while the LEDs will light up. If you flashed the Wifi version, you need to connect the D1 Mini to wifi. To do this open youw Wifi Settings on the phone and look for a hot spot called "AirGradient xxx". Then connect to it and enter your Wifi network credentials. It will then connect to Wifi and start sending the air quality data.
If there are any issues, you can double check this tutorial and also the images. If you still have problems, please feel free and get help from our forum!
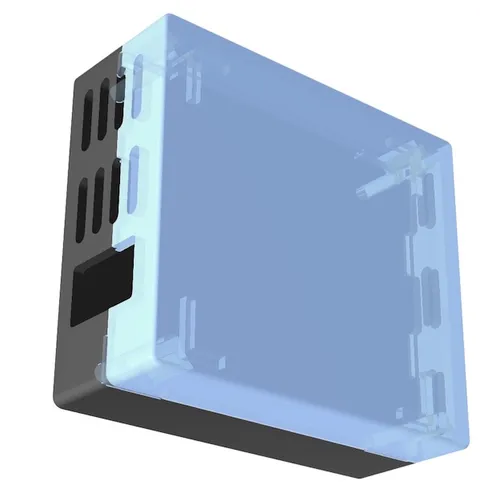
3D Enclosure and Mount
We have created a 3D printable enclosure that exactly fits the LED matric and the AirGradient DIY board consisting of a top and bottom part.
Solutions for Schools
AirGradient offers a sophisticated Air Quality Monitoring Solution for Schools. You can connect the AirGradient DIY CO2 Traffic Light to our platform, integrate with many existing brands or use our professional AirGradient sensor.
If you are interested to learn more, please contact us.
MIT License
The AirGradient DIY sensor's hardware and software is Open Source and licensed under the MIT license. So feel free to use it any way you like! However we would be happy to hear from you and also appreciate any link back to our page.
Copyright AirGradient Co. Ltd.
Permission is hereby granted, free of charge, to any person obtaining a copy of this software and associated documentation files (the "Software"), to deal in the Software without restriction, including without limitation the rights to use, copy, modify, merge, publish, distribute, sublicense, and/or sell copies of the Software, and to permit persons to whom the Software is furnished to do so, subject to the following conditions:
The above copyright notice and this permission notice shall be included in all copies or substantial portions of the Software.
THE SOFTWARE IS PROVIDED "AS IS", WITHOUT WARRANTY OF ANY KIND, EXPRESS OR IMPLIED, INCLUDING BUT NOT LIMITED TO THE WARRANTIES OF MERCHANTABILITY, FITNESS FOR A PARTICULAR PURPOSE AND NONINFRINGEMENT. IN NO EVENT SHALL THE AUTHORS OR COPYRIGHT HOLDERS BE LIABLE FOR ANY CLAIM, DAMAGES OR OTHER LIABILITY, WHETHER IN AN ACTION OF CONTRACT, TORT OR OTHERWISE, ARISING FROM, OUT OF OR IN CONNECTION WITH THE SOFTWARE OR THE USE OR OTHER DEALINGS IN THE SOFTWARE.