Monitor Calibration
In Chapter P2 (Defining Your Air Quality Project) you have defined how accurate your data needs to be to achieve your project aim. This chapter explains different options to calibrate your monitors to achieve the level of accuracy you need.
Key Highlight
To improve the accuracy and reliability of the sensors, you can calibrate them. Based on the availability of reference data, there are several calibration methods you can use. These have different levels of complexity and result in different levels of accuracy. We recommend applying at least the simplest calibration method for better results.
To make sure your sensor network provides accurate and reliable data, follow these two key steps before deployment:
Reproducibility Check – Verify that all sensors give consistent readings.
Calibration – Adjust sensor measurements to improve accuracy.
These steps are typically done at the start, before deploying the sensors at your project locations. The reproducibility check can be performed at the same time as calibration.
1. Reproducibility Check
If you’re using multiple sensors, it’s important to confirm that they measure consistently. Here’s how:
Place All Sensors Together: Set up all sensors in the same location for a period of time so that they are exposed to the same air. If you have access to a reference instrument, locate them next to it (see Calibration with a local reference instrument).
Compare the Readings: Check if all monitors produce similar measurements. You can use the Analysis function of the
Dashboard for this. If you observe significant differences, this may indicate a faulty sensor.
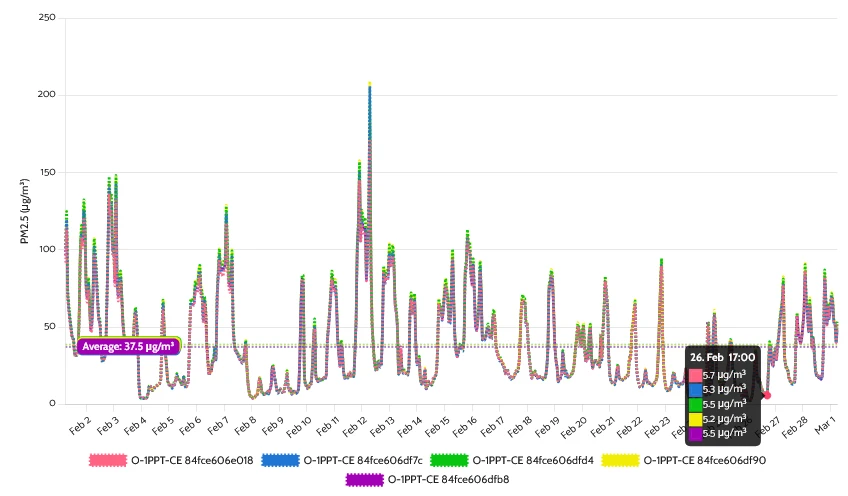
Below are the three potential outcomes, and how you should proceed if you identify them:
Case 1: All Sensors Show Consistent Measurements
If all sensor readings align closely, forming (or nearly forming) a single line, it means the measurements are consistent and reproducible. This confirms that all sensors have passed the reproducibility test, and you can proceed with calibration and deployment.
Case 2: Identifying a Sensor That Needs Adjustment
If a monitor’s readings do not align exactly with the rest but still follow the same trend (same overall shape), the sensor is functioning but needs sensitivity adjustment.
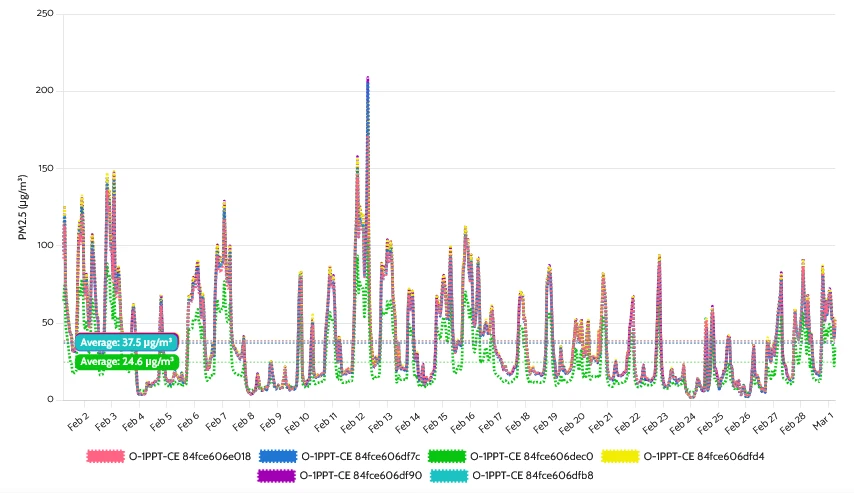
What to do?
- If you are calibrating with a local reference, this adjustment will happen automatically during that process.
- If not, you can manually adjust the sensitivity of the identified sensor. Follow the steps in Section 4: Calibration with a Local Reference Instrument, using a healthy sensor as the reference.
Case 3: Identifying a Faulty Sensor
If a monitor shows significantly different readings (e.g., a completely different pattern), it is likely faulty.
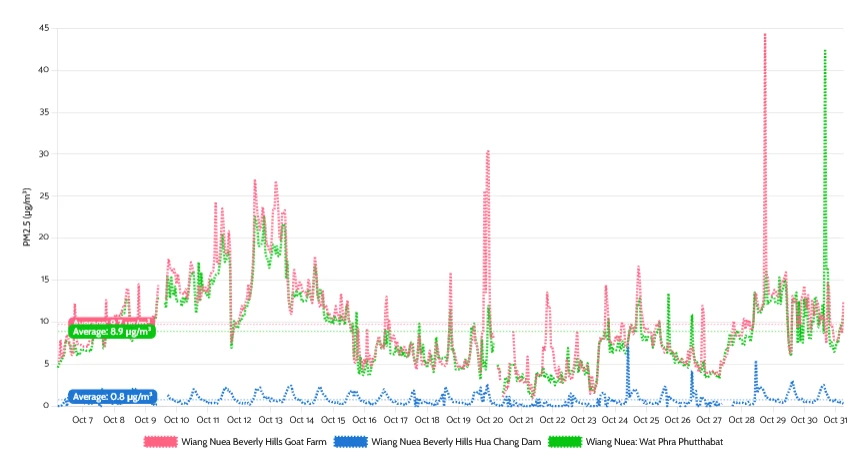
What to do?
- First, confirm that the sensor is indeed co-located with the others.
- Inspect the sensor for visible damage or obstructions. If you find an issue (e.g., a spider web inside the monitor), remove the obstruction and retest.
- If no clear cause is found, replace the sensor module within the affected monitor. Send a support ticket through the AirGradient website for assistance: https://www.airgradient.com/support/
2. Selection of the calibration method
There are several approaches to sensor calibration, and the method used depends on how accurate you need your data to be and whether you have access to reference data. The diagram below helps you to decide which calibration method you should use.
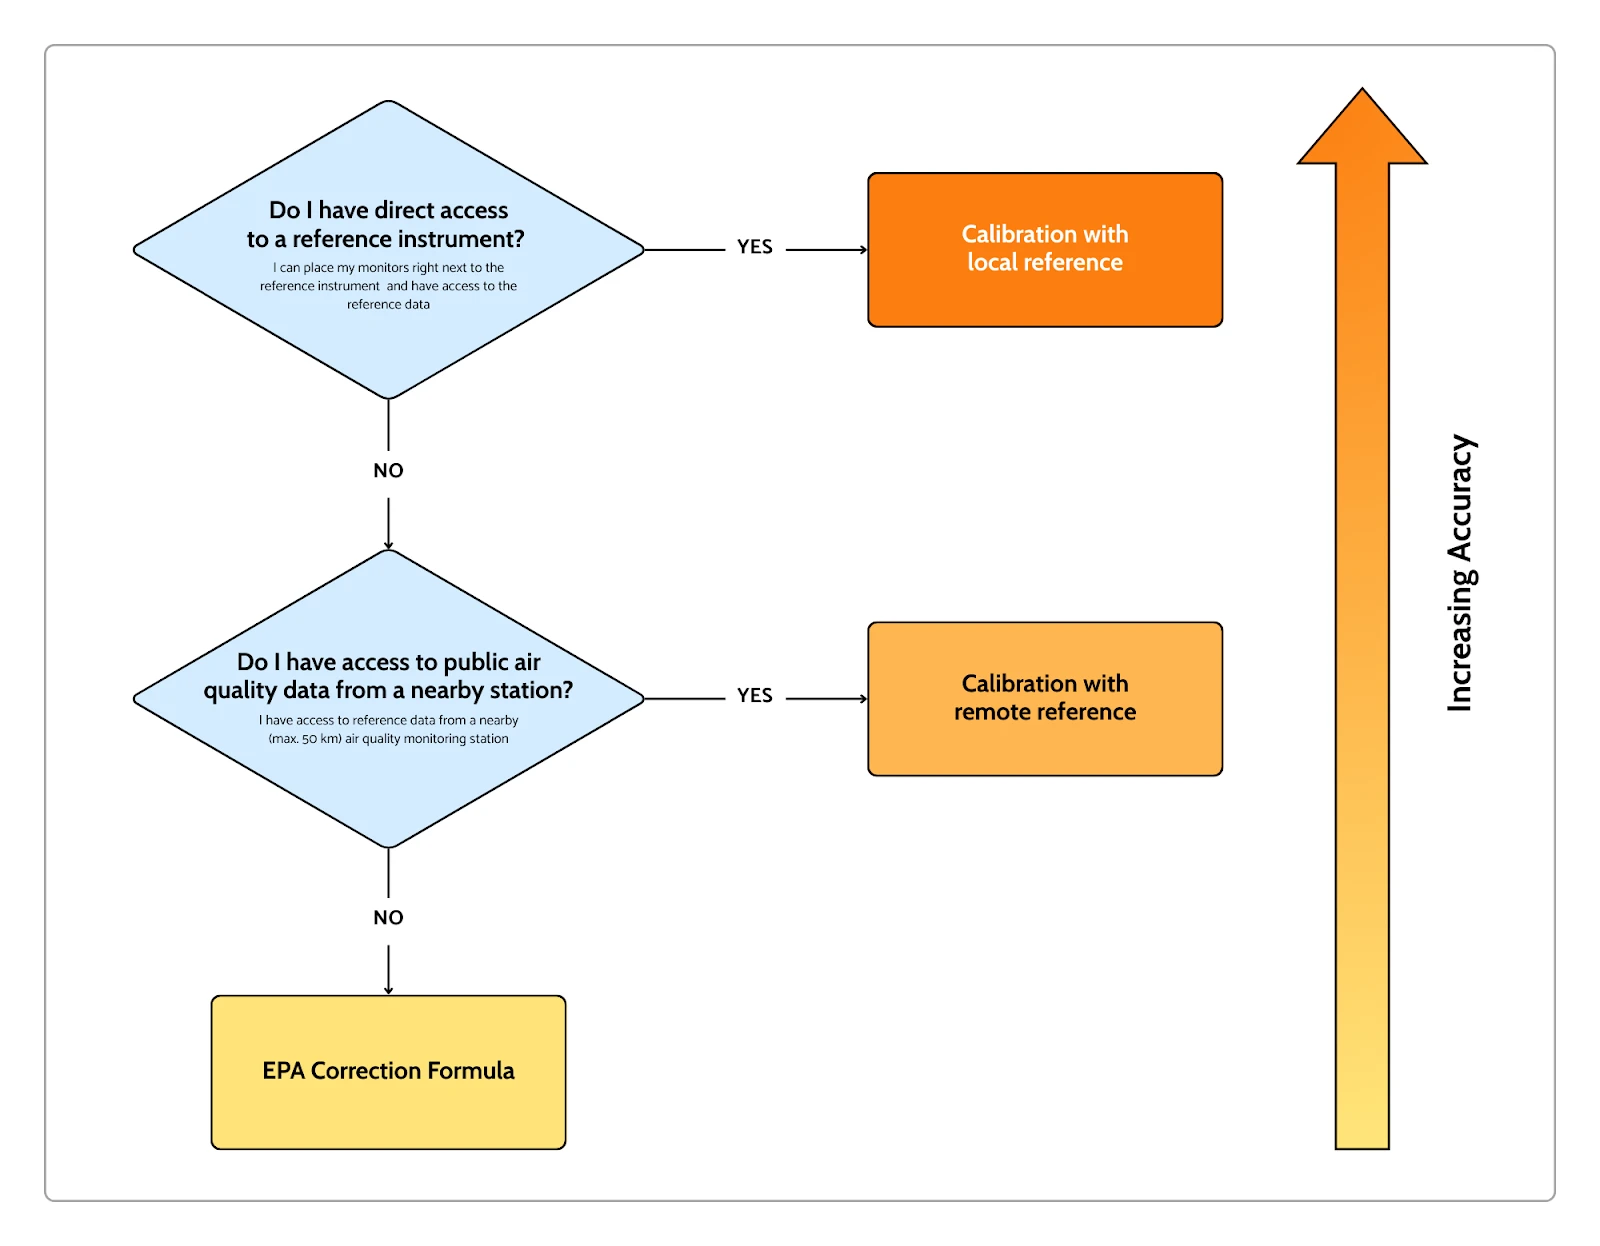
Each of the methods will be explained in detail below but here you can find a brief summary of every method:
Calibration with local reference: The most accurate method is to co-locate your monitors with a local reference instrument in the same area (e.g. city) where the deployment takes place prior to deployment. However, not many people or communities have direct access to a high-level reference instrument and can place the low-cost monitors directly next to it.
Calibration with remote reference: When access to a physical reference monitor is limited, publicly available data from nearby air quality stations can be used to adjust sensor readings.
EPA Correction Formula: This calibration formula has been developed by the US Environmental Protection Agency. It can easily be applied and does not require a reference instrument. However, it does not account for the specific local conditions of your deployment.
These different calibration methods vary in accuracy, but all of them improve the overall sensor performance. Whether you have access to advanced monitoring equipment or are relying on alternative methods, proper calibration is important for high-quality air quality data. Without calibration, the absolute concentration readings may misrepresent actual pollutant levels. Therefore, we recommend applying at least one of the above mentioned methods.
3. What are reference instruments?
Before we get into explaining each of the above mentioned calibration methods, just a few words to the term “reference
instruments”: These are high-precision, regulatory-grade devices used to measure air quality and serve as a standard for
comparing and calibrating other sensors. They are designed to provide highly accurate and stable measurements of air
pollutants such as PM2.5. These instruments are certified by regulatory bodies such as the U.S. Environmental Protection
Agency (EPA) or the European Union and are regularly calibrated to ensure their reliability. Most reference instruments
are run by governmental institutions such as municipalities or environmental state agencies or research institutions
such as universities.
Reference instruments are considered the gold standard for air quality monitoring because of their accuracy and
consistency, making them essential for regulatory compliance, scientific research, and evaluating the performance of
low-cost sensors. However, they are expensive, bulky, and require specialized maintenance, which limits their use for
widespread or low-cost applications. This is why they are frequently used to calibrate more affordable sensors to ensure
reliable and comparable measurements.
4. Calibration with a local reference instrument
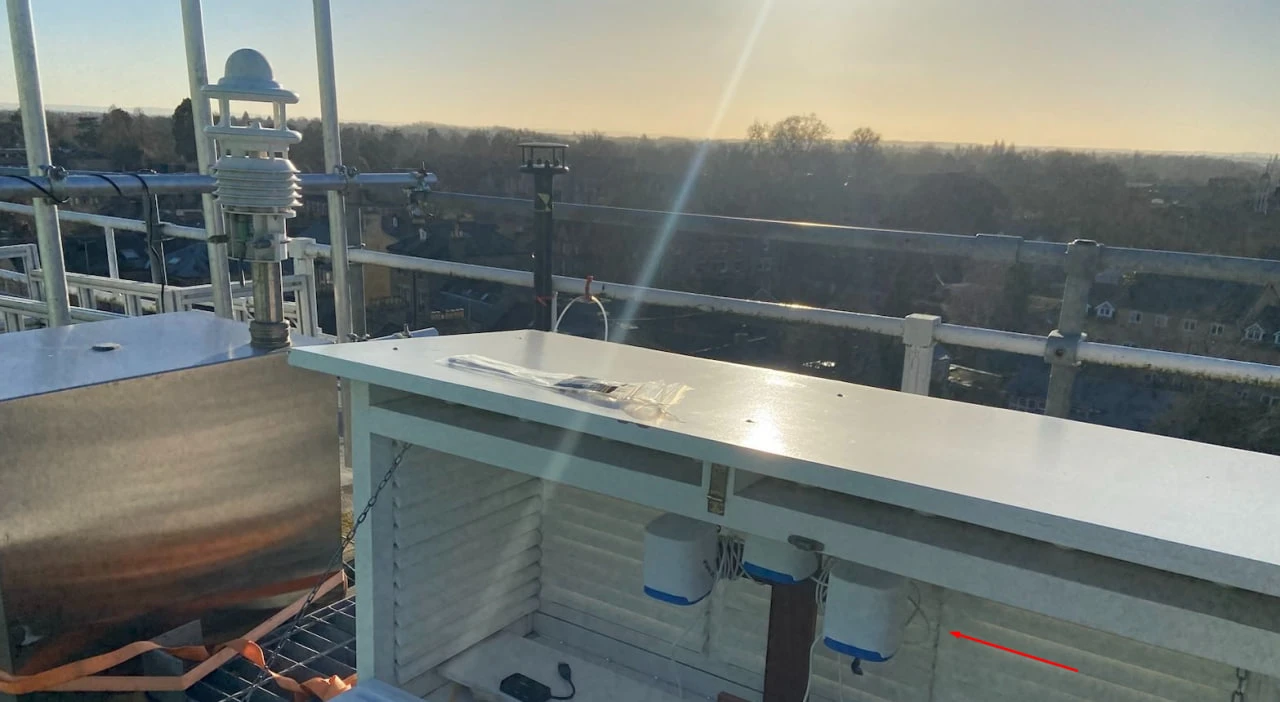
Calibrating a low-cost sensor against a local reference instrument is the most accurate method of calibration because it accounts for the exact environmental conditions where the sensor will be used. To do this, you place the sensor next to a high-quality reference monitor1 (“co-location”) for a period of time (“calibration period”) so both measure the same air. Note that the calibration period can also be used for the reproducibility check. If space allows, place your entire sensor network next to the reference instrument and do both checks in parallel.
4.1. Considerations for the Co-location
For the best performance outcome, you should ensure that the reference instrument and sensor experience the same environmental conditions during co-location as they will in actual use (i.e. during your deployment). You can achieve this by following these points:
- Position of the Sensor(s): Place the sensor close to the inlet of the reference instrument (within a few meters) to ensure both are exposed to identical air quality and environmental factors (e.g., sunlight, humidity, and wind).
- Location of the Monitoring Station: Choose a reference site with environmental conditions similar to your deployment area.
- Duration: Run the co-location long enough to capture the full range of expected conditions, ideally at least for 2 weeks.
- Season: If possible, the calibration should take place in the same season as your deployment. Most commonly, it is performed directly before or after the deployment (or both).
Use the reference monitor only if you are confident the data is accurate. Sometimes, reference monitors can be inaccurate due to poor maintenance or a lack of calibration. Using an inaccurate monitor may lead to errors in calibration.
4.2. Continuous data quality
If possible, keep one or two monitors from your network next to the reference station throughout the entire duration of your deployment. This allows you to track long-term changes in measurement performance, such as drift and seasonal variations. This step is especially important for long-term deployments spanning multiple seasons or years.
4.3. Automised Calibration Tool
By comparing the data from the reference instrument with those from the monitor(s), calibration parameters are
calculated via linear regression:
PM2.5 (calibrated) = PM2.5 (raw) * scaling factor + intercept
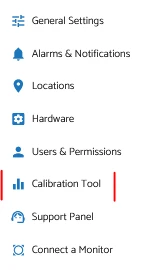
This process typically requires advanced analytical skills, but AirGradient’s built-in calibration tool automates the
process by extracting the necessary parameters and applying them to whichever monitors you select. You can find the tool
in the side menu of the Dashboard:
Import the reference data into the platform
To import the reference data into the Dashboard reach out to the AirGradient customer support.
THE AUTOMATISATION OF THIS FEATURE IS UNDER DEVELOPMENT
Select your data
First, specify which sensors you want to calibrate and select the data to use for calibration. To do this, complete the
following interface:
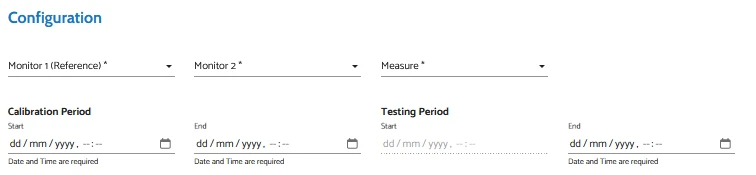
| Monitor 1 (Reference) | Select your reference instrument (needs to be connected to your Dashboard) |
| Monitor 2 | The monitor that you wish to calibrate |
| Measure | The sensor type that you wish to calibrate (PM2.5, Temperature, Humidity) |
| Calibration period | Start and end date of the period you would like to use for the calibration, i.e. the time when the reference monitor and the low-cost monitor were placed together |
| Testing period (optional) | You can use the testing period to validate whether your calibration method works as expected. It is an optional test, mainly intended for scientific applications. In this document we will focus on the calibration period only. |
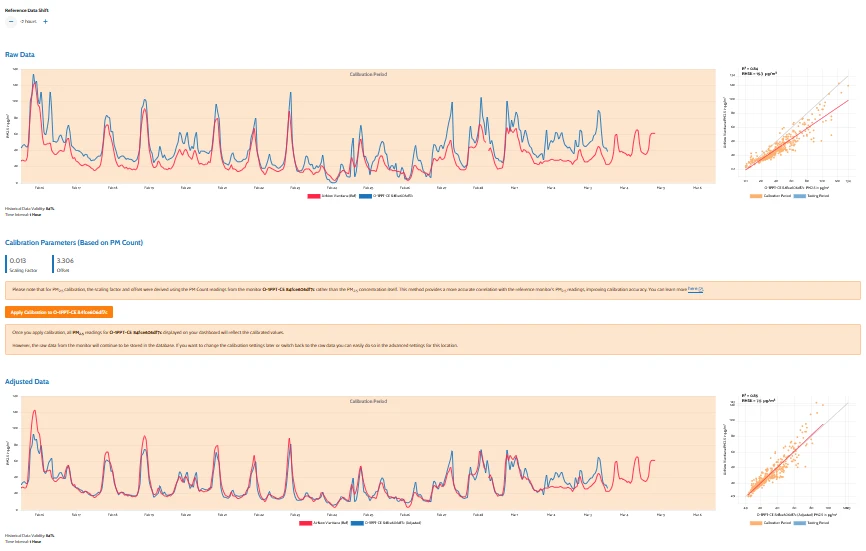
Visualisation of the data and time alignment
As soon as you have selected the data (Point 2) the system will visualise it:
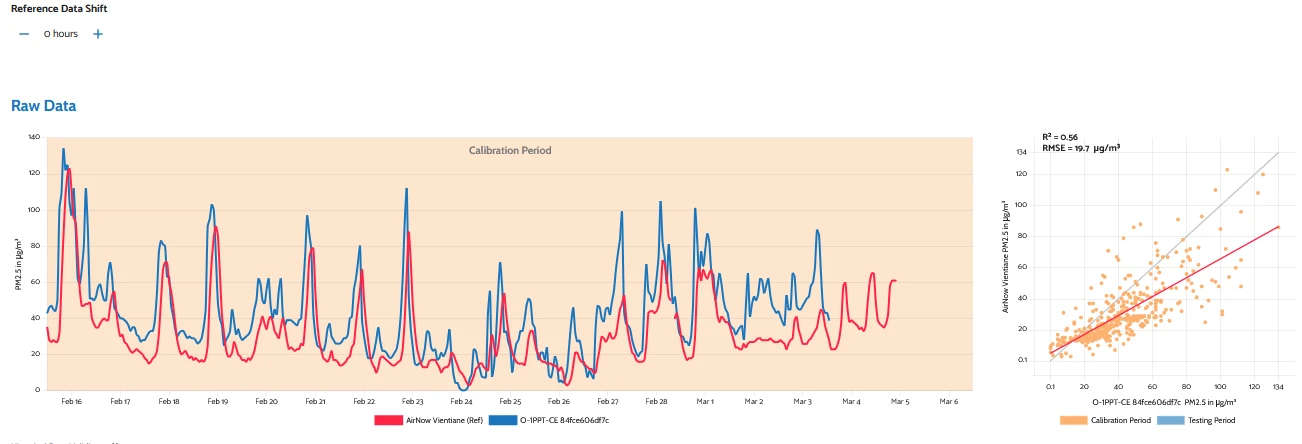
The interface displays raw sensor vs. reference data (left) and a scatterplot comparing them (right). The RMSE value in the scatterplot provides information about the average error of the low-cost sensor (find more information in this blog article). The R2 value shows how well the low-cost sensor tracks the concentration trends of the reference. The closer it is to 1, the better the correlation.
It can happen that the time stamps of the reference instrument are not aligned with those of the AirGradient sensors, as shown in the above example. You can use the “reference data shift” function to align the two measurements in time. You have found the correct shifting period when you reach the maximum R2 value.
Automatic calibration
The tool automatically extracts the calibration parameters from the data set. These can be immediately applied to the low-cost sensor by pressing the orange button (Apply calibration to [name of sensor]). You can find the values of the parameters (scaling factor and offset) below the first graph of the tool.
Please note that for PM2.5 calibration, the scaling factor and offset were derived using the PM Count readings rather than the PM2.5 concentration itself. This method provides a more accurate correlation with the reference monitor’s PM2.5 readings, improving calibration accuracy. You can learn more here.
Note for PM2.5 calibration: The calibration tool doesn’t factor in relative humidity (RH) effects or non-linear responses. However, in most cases, their impact on the data accuracy of the Plantower module is small. If you need the highest level of scientific accuracy, you have to fine-tune this calibration formula manually.
5. Calibration with a remote reference
If no direct access to a reference instrument is available, the monitor can also be calibrated using reference data from public reference stations.
In many regions, air pollution levels are measured by air quality monitoring stations which are often managed by governmental institutions. These monitoring stations usually contain high-level reference instrumentation and many of them publish their data openly. You can find some advice in the FAQ section on how to find such public reference stations around you.
5.1. Place sensors away from local emission sources
Ideally, as in the method above, you should expose your monitors to the same pollution as the reference station. Since
you cannot place your monitors directly next to the reference instruments, there are some points to consider:
Monitoring stations are classified based on their proximity to local emission sources. This determines the type of air
pollution they observe. They can measure:
- Background concentrations (placed away from direct emission sources), or
- Local emissions (e.g. traffic pollution - station is placed at the roadside).
To calibrate your sensor(s) with a public reference station, you need to select one that measures no direct emission
sources but the background pollution levels, because the local air pollution varies too much and is not homogenous
over larger areas (which the background pollution is).
At the same time you need to make sure that the sensor you want to calibrate is exposed to the same background
pollution, i.e. placed away from any direct emission sources.
5.2. Network extraction
If you can’t ensure that your sensors are placed away from emission sources, you can extract the background concentration from a network of sensors that is distributed over an area. Individually, they might be exposed to local emission sources but you can extract information on the background pollution levels by leveraging the entire network.
5.3. Comparison with remote reference
Whether you have directly measured background pollution or extracted the background levels from your sensor network,
these levels need to be compared with the public reference data. This follows the same procedure as described
in Section 4 (Calibration with a local reference instrument): You import
the public reference data into the Dashboard and use the automatic calibration tool to determine the calibration
parameters and apply them to your sensors.
Once the development of this feature is completed, we will explain this procedure in more detail.
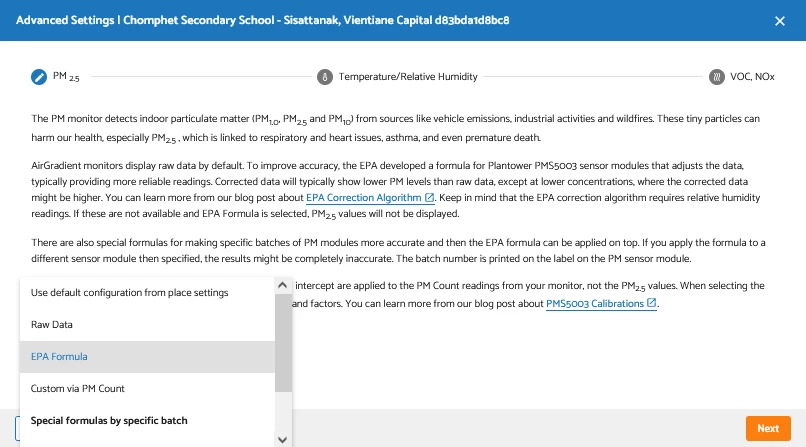
6. EPA correction formula
The U.S. Environmental Protection Agency (EPA) has developed a correction formula specifically for the PM sensor type integrated in the Airgradient monitors (Plantower model PMS5003). It has been developed in several iterations over the course of 1.5 years (April 2020 - Oct 2021), comparing low-cost sensors (Purple Air) against official U.S. government reference stations. The formula accounts for RH effects and non-linear responses of the sensors at very high concentrations (> 100 ug/m3), so it is particularly suitable for extreme pollution events such as wildfires, but works also well for lower concentrations. The EPA uses it to adjust raw PurpleAir data for the AirNow Fire and Smoke Map.
It’s a universal formula, meaning it’s not customized for individual sensors and was developed using U.S.-specific aerosol data. However, we’ve found that it also improves the accuracy of AirGradient PM sensors worldwide. You can check out the full analysis (including the formula) here.
Practically, this calibration method is very easy to apply. You can simply select this option on the Dashboard under Advanced Settings:
7. Frequently Asked Questions (FAQs)
When should I do a reproducibility test?
We recommend a reproducibility test if you’re using 3 or more monitors. Simply place the monitors next to each other for a while and track the data. This helps ensure the reliability and consistency of your monitors.
Where should I perform the reproducibility test?
Ideally, you should perform the test in a similar environment in which you are planning to deploy the sensors for your project. If that’s not possible, anywhere is fine. Even on a kitchen or office desk. Just make sure that all sensors are placed close to each other so that they are exposed to the same air.
Why do I need to calibrate my monitors?
Using a local reference for calibration ensures the sensor reflects the real-world conditions of your specific monitoring location. For example, particles in the air can come from various sources like sea spray, traffic, or wildfire smoke, each with different characteristics. Calibration with a local reference accounts for these variations, improving the accuracy of your PM2.5 measurements.
Does my monitor also work without calibration?
Without calibration, the sensors in the AirGradient monitor provide enough accuracy to give you an idea of the general pollution levels, observe trends, and detect pollution events or hotspots. The raw data do, however, contain uncertainties. For example, Plantower sensors have a maximum error of ±10μg/m3 (±10% for concentrations above 100 μg/m3).
For more accurate measurements, sensor calibration is needed. Considering that the EPA calibration method is really easy to apply (by just pressing one button), we recommend applying at least this basic method.
How often do I need to calibrate my sensors?
For most applications, a single calibration before deployment is enough. However, if scientific accuracy is critical, use a local reference and consider leaving one or two sensors at the reference for the duration of your deployment. Alternatively, you can re-locate your sensors with a reference after deployment to check for drift (optional). For ongoing calibration methods, see Chapter O3: “Maintaining Data Quality and Accuracy”.
How can I find nearby reference monitoring stations?
(Calibration with remote reference)
The following resources help you to identify nearby air quality monitoring stations that you might use for the remote calibration.
1. Local Government Environmental Agencies
Many countries have official websites where air quality data is published.
- Examples:
- USA: AirNow.gov
- Europe: EEA Air Quality Index
- China: China National Environmental Monitoring Center
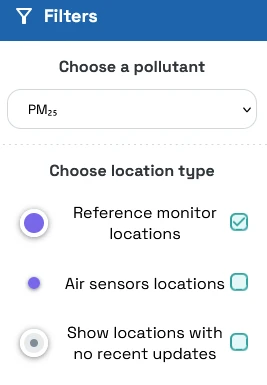
2. OpenAQ
OpenAQ is a nonprofit organization that collects and shares air quality data worldwide. You can explore their
map (OpenAQ Map) to find reference monitoring stations near you—just ensure
that only the “Reference monitor locations” filter is selected.
AirGradient partners with OpenAQ, contributing public outdoor data to the platform, making it also easy to integrate OpenAQ data into the AirGradient Dashboard in return.
Links to Additional Third-Party Information
| Resources | Resource Link |
|---|---|
| AirNow Fire and Smoke Map Questions and Answers | Read More |
| Performance Testing Protocols, Metrics, and Target Values for Fine Particulate Matter Air Sensors (U.S. EPA) | Read More |
Use the reference monitor only if you are confident the data is accurate. Sometimes, reference monitors can be inaccurate due to poor maintenance or a lack of calibration. Using an inaccurate monitor may lead to errors in calibration. ↩︎
Developed by AirGradient in Collaboration with the UNDP Global Centre Singapore CC-BY-SA