Mounting
This guide assumes you have already read the site selection guidelines. If you have not, please refer to that guide first to ensure you are deploying your AirGradient monitor in conditions that ensure optimal performance. Once you have selected a location based on the guidelines, please refer back to this guide on monitor deployment.
Deploying the AirGradient Open Air models is designed to be straightforward and simple, and the onboarding process on the dashboard provides an easy entry point. However, we still recommend running through the checklist and steps in this document to ensure a seamless deployment.
Key Highlight
AirGradient monitors can be quickly and easily added to the AirGradient dashboard. For seamless onboarding, we recommend following the guide on our website, which can be found here. This will walk you through all of the steps necessary to set up your device.
1. Deployment Checklist
While this guide focuses on mounting your monitor, since this will be the final deployment location of the monitor it’s important to run through all of the steps below to ensure the monitor is working before it is put in its permanent placement. The list below acts as a checklist, and please refer to section 3 for further details on how to mount your monitor.
Safety Notice: If you will be using ladders or other potentially dangerous equipment to deploy the monitors, please ensure you have taken the necessary safety precautions.
1.1. Pre-Deployment Testing
Firstly, confirm what your monitor is:
- O-1PST (Open Air) - WiFi
- O-1PST-CE (Open Air Cellular Edition) - Cellular
- O-M-1PPSTON-CE (AirGradient Open Air Max) - Cellular
- Plug in your monitor via USB. The device does NOT have a power button.
- If you haven’t done so yet, follow our guide to connect the monitor to your AirGradient dashboard as described in Chapter S3.1: Connecting Your Monitor to the Internet or Chapter S3.2: Connecting Your Monitor to the Internet (WiFi Model) This is where you can collect data from the device.
- Verify power supply and cellular connectivity. To ensure that connectivity is working, we recommend checking the AirGradient dashboard to confirm the monitor is reporting data.
- Temporarily mount the monitor to test weather conditions and nearby pollution sources. Use the dashboard to check trends and see if the device is being impacted by local pollution sources.
1.2. Placement
- Ensure you have permission to install the monitor in the intended location.
- Install at least 100 cm above any floor or surface.
- Ensure the blue vent is facing downward and unobstructed for good airflow.
- Choose a shaded location if possible.
- Avoid placement near doors, windows, air conditioners, or exhaust vents.
- Position away from direct pollution sources like chimneys or industrial equipment.
- Ensure the monitor is securely mounted and, if possible, sheltered from extreme weather conditions like heavy rain or strong winds. In areas prone to heavy rainfall, consider using weather-resistant enclosures or protective covers to minimize exposure and potential damage.
1.3. Mounting
- Use cable ties or wire for temporary installations on poles or fences.
- For permanent setups, use M4 screws with the mounting bracket, ensuring a secure fit. Cable ties can also be used for permanent installations.
- Use the anti-theft screw slot for added security if needed.
1.4. Maintenance Access
- Ensure the monitor is easily accessible for routine cleaning of the vent and sensor modules.
1.5. Final Verification
- Confirm that all mounting equipment is weather-resistant (some materials, such as string, can quickly degrade in extreme weather) and securely fastened.
- Check the power connection and cable management for stability and protection from damage. Ideally, keep the power cable off the ground to prevent accidental disconnections.
- Check that the data appears on the AirGradient dashboard
2. Mounting Methods
The AirGradient Open Air and Open Air Max come with a mounting bracket on the back of the device designed to allow flexibility during the mounting process. We recommend different mounting methods depending on whether or not the installation will be permanent or temporary (such as for testing purposes).
Open Air Max
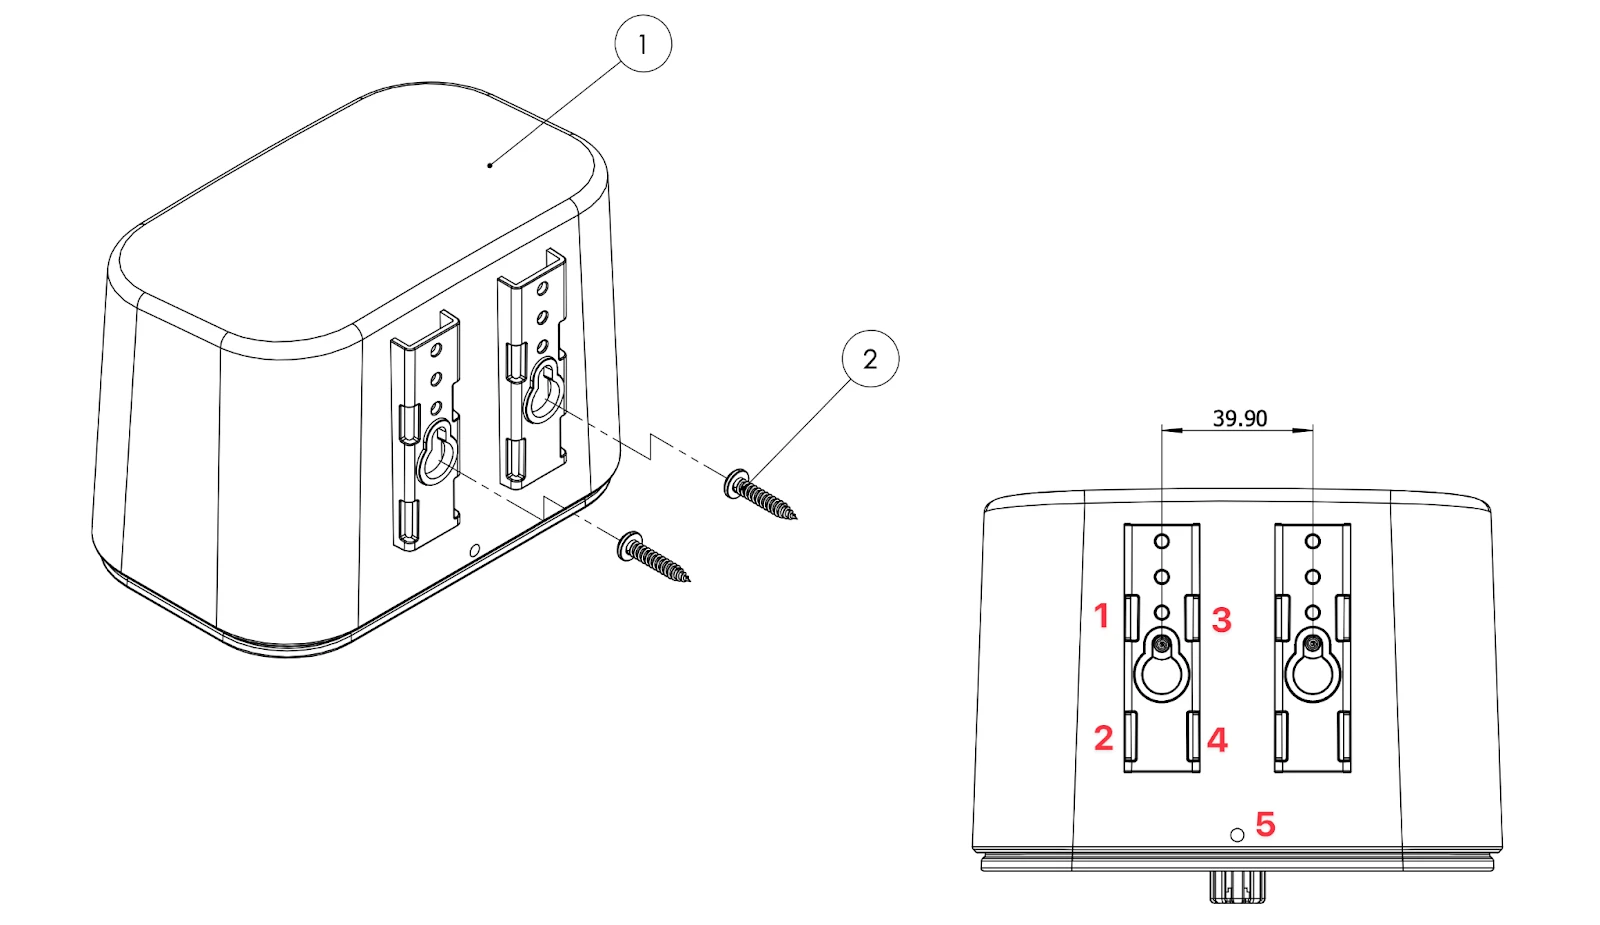
Open Air (O-1PST & O-1PST-CE)
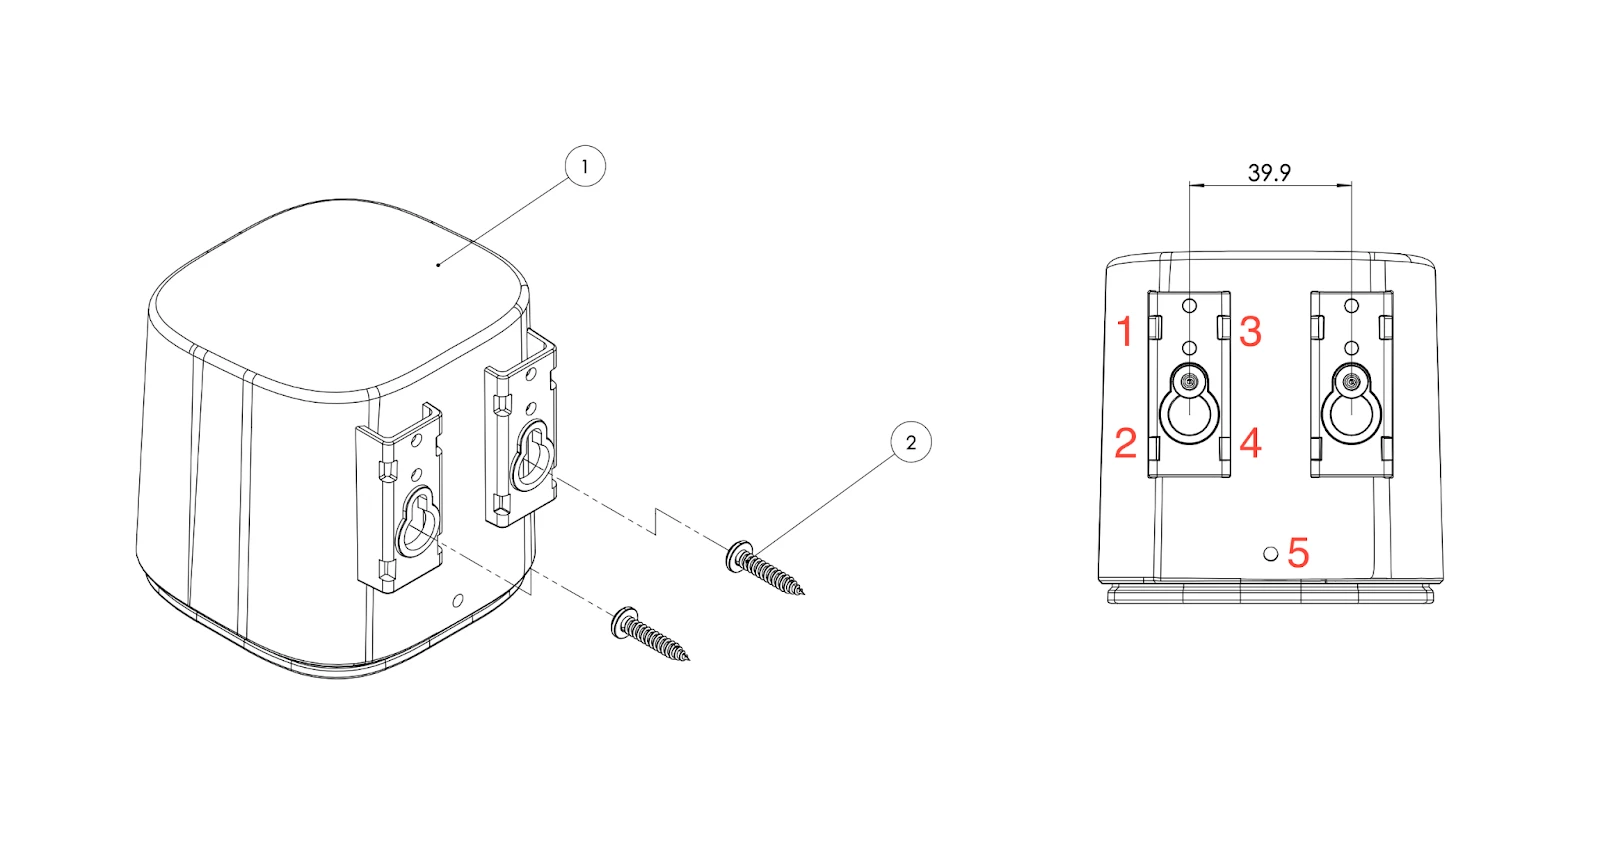
For temporary installations, cable ties, sturdy string, or wires can be passed through the four holes on the sides of each bracket (marked 1-4 on the image above). This method is best suited for mounting the device on poles, fence posts, or any other object to which the monitor can be tied. We recommend cable ties or wire for this method, as they won’t degrade significantly due to weather conditions. The cable ties or wires do not come with the monitor toolkit.
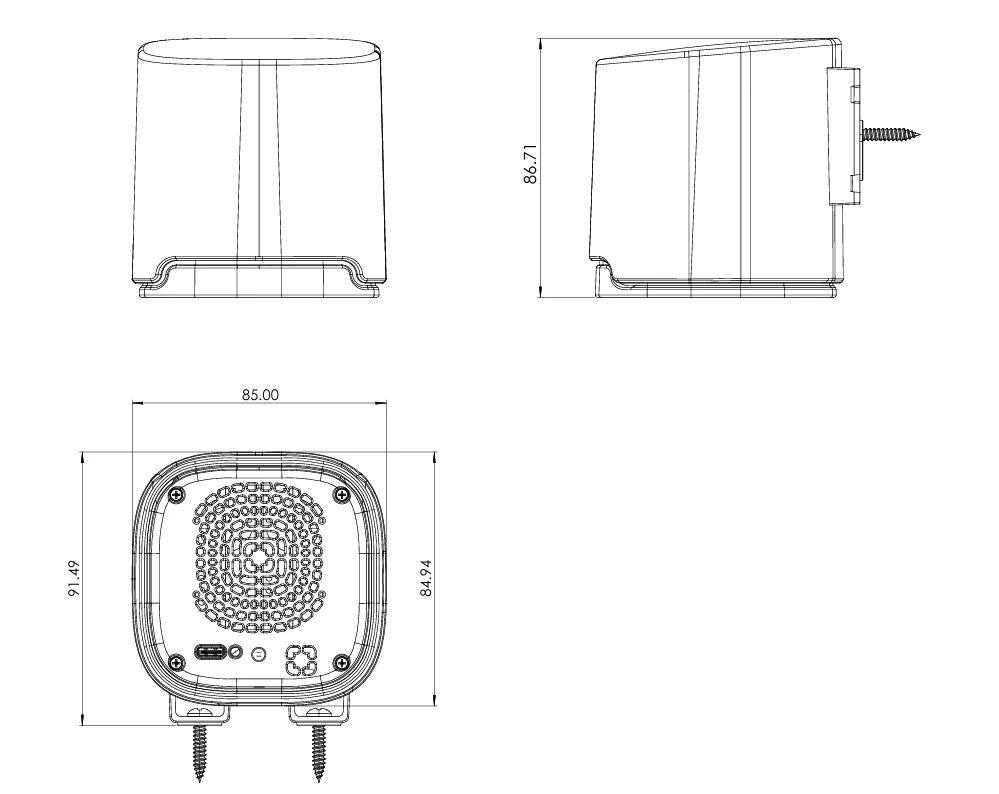
For permanent installations, or when installing the device on a flat surface where cable ties or wire can’t be used, we recommend using the two large screw mounts (located 39.9mm apart) and drilling two M4 screws into the surface with the screw heads sticking out. The monitor can then be mounted on these heads and pushed down to ensure a solid mount. When removing the monitor, push it up before pulling it off the wall.
For additional security, each Open Air features an additional hole for screws at the bottom (marked 5 on the image above) of the monitor. This slow is intended to be used as a theft deterrent and will ensure the monitor can’t be quickly removed from its mounting position.
Below is a diagram showing the full dimensions of the Open Air and how it will look when mounted with M4 screws. Please note the screws should first be screwed into the surface which you want to mount the monitor on.
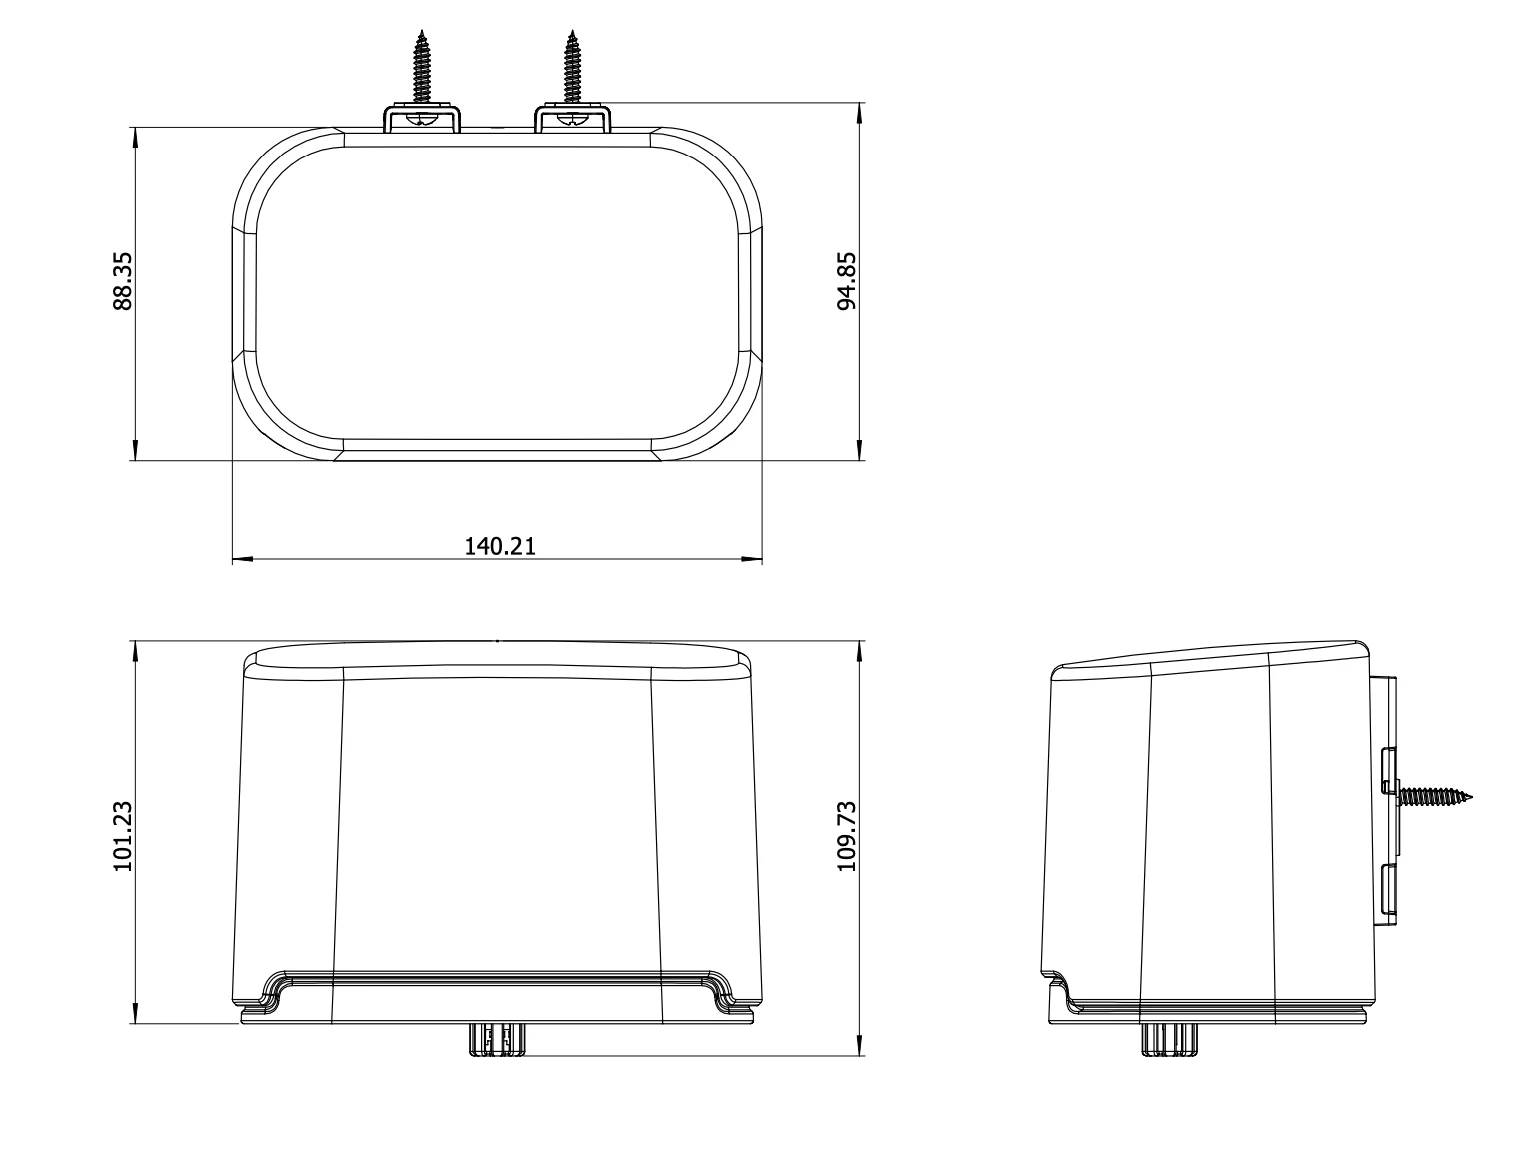
The Open Air Max has two mounting brackets on the back of the device, but it can be mounted using the same methods as the Open Air. The only key difference is to ensure that the Open Air Max is securely mounted, as the extra weight can make it more prone to falling - especially in extreme conditions.
3. Deployment Steps
Once you have selected a site to deploy the monitor, received permission to deploy the monitor there, and you have decided on a mounting method for the device, it’s time to deploy it.
Before deploying the device in its final (permanent) position, we recommend first ensuring that the device has cellular connection which is discussed in Chapter S3.1: Connecting Your Monitor to the Internet (Cellular Model) or S3.2: Connecting Your Monitor to the Internet (WiFi Model).
Once you’ve connected your device, please log in to your dashboard to confirm the device is reporting data. If it isn’t connecting, we recommend going through the steps covered in Chapter S4: Connecting Your Monitor to the Dashboard. If the issue persists, you may reach out to https://www.airgradient.com/support/ and we will help you resolve the issue.
If the device is connected and you can see data reporting on your dashboard, you’re ready to set it up in its final state.
If you’re mounting the device on a flat surface (that can be drilled into), mounting the device via screws is often the best approach. If you will deploy the monitor on a fence or post, zip ties are the most convenient solution. Once mounted, you can plug in the device and test it again to ensure it’s working properly.
If this is the case, it’s also important to do some cable management if needed. Loosely hanging wires can be easily dislodged and accidentally pulled out. As such, we recommend taping the wires to a surface like a wall if possible. If this isn’t possible, cable ties or hiding the cable are also good approaches. You will also want to ensure the power adapter is socketed correctly, as, if this falls out, the device will need to be plugged in again.
Once these steps are completed, you’ve successfully deployed your monitor!
4. Frequently Asked Questions (FAQs)
Please refer to the topics below for the answers to frequently asked questions. If you have additional questions that are not answered in this section, please refer to the support section in the document.
What routine maintenance is required for the monitor?
The O-1PST should not require regular maintenance. However, for the best performance, users can clean the vent and PM sensor to prevent debris accumulation and clean out insects that may have entered the sensor. The monitor should be installed in a location that allows easy access to these tasks.
How can the mounted monitor be powered?
The AirGradient Open Air monitor is powered via the included 4-meter USB cable, which connects to a standard USB power adapter. The cable length allows flexible mounting at the recommended height.
For reliable operation:
- Secure Connection: Connect the cable to a weather-protected power source or ensure the power source is located indoors and protected from the elements.
- Cable Management: Use ties or conduits to secure the cable and prevent damage. The cable itself (minus the USB ports at the end) are weatherproof, and do not need to be covered. However, if you want to increase the longevity of the cables, they can be covered with waterproof tape. The most important factor here is to ensure the cable is secured so it won’t be accidentally unplugged from the monitor.
Proper cable protection ensures uninterrupted operation in urban environments.
What type of surface is ideal for mounting the monitor?
The monitor can be mounted on most surfaces, including walls, poles, or fences. Choose a surface that does not retain excessive heat from sunlight (lighter surfaces are better, but best is a surface that is shielded from direct sunlight) and ensure the monitor is securely fixed to avoid movement or tampering.
Is special equipment required to mount the monitor?
The monitor can be installed using basic mounting tools such as screws, zip-ties and wire, depending on the surface. Ensure all equipment used is weather-resistant and suited for outdoor conditions.
Can the monitor be relocated after installation?
Yes, the monitor can be easily relocated if needed. Ensure the new location adheres to the recommended mounting guidelines, including height, orientation, and distance from obstructions or pollution sources.
Should the monitor be tested before deployment?
Yes, testing the AirGradient Open Air monitor before permanent deployment is recommended. Temporarily mount it using zip ties (or another temporary solution) at the planned height to assess factors like airflow, sunlight, and nearby pollution sources. If possible, we recommend calibrating the monitor locally (as conditions between locations can differ greatly) following the instructions in this document.
We also recommend comparing temperature and relative humidity readings to local conditions and confirming they are within an expected range of reference equipment (if data is available).
Developed by AirGradient in Collaboration with the UNDP Global Centre Singapore CC-BY-SA