We have long been strong proponents of PPS (Positive Pressure System) because they perform significantly better than an air purifier at keeping particulate matter away from your home, especially in heavily polluted areas. Additionally, the side effect of PPS that an air purifier cannot do is pushing CO2 that builds up in the room away. We recommend that you also take a look at our previous articles about PPS to understand how it works and why it performs better. They will also give you a lot more ideas about how to adapt the system to your own space.
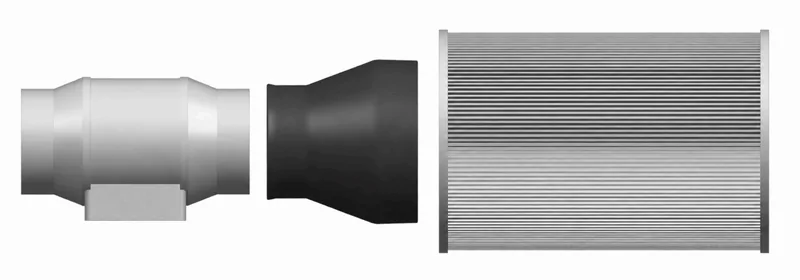
Having a positive pressure system installed in your house may sound intimidating and costly. So, in these build instructions, we are going to show how to build a low-cost DIY positive pressure system with an approximately $50 budget that really works. You only need 4 main components, which are: a cylindrical Xiaomi HEPA filter, a 3D-printed adapter that connects the HEPA filter to the duct fan (STL and STP 3D files are provided in these instructions), a 4-inch AC duct fan, and a 4-inch inner-diameter insulated duct. You may need additional aluminium foil tape to seal the gap between the insulated duct and the duct fan outlet, and some sealing material to seal tightly around the duct that goes through the wall hole or a modified window.
If you'd prefer to watch a video than read the article, you can do so below!
Components
- Xiaomi HEPA filter (the grey H13 HEPA variant recommended - M8R-FLH)
- 3D-printed adapter (HEPA filter to duct fan)
- 4-inch AC duct fan
- Insulated duct with 4-inch inner diameter
- Aluminium foil tape
Xiaomi HEPA filter
We use a Xiaomi HEPA filter with the model name M8R-FLH, which is relatively easy to find, cost-effective, and performs well. We recommend sourcing from a reliable supplier to ensure that you get the original high-quality filter. It is important to use a high-quality filter because, unlike in an air purifier, a PPS only filters the dirty air once when it sucks the air into the room, so you need to make sure that the air sucked into the room is clean.

3D-Printed Adapter
Our engineer designed a 3D-printed adapter to put the duct fan and the filter together tightly. You can find the link to the .stl and .stp files here so you can print it yourself.

4-Inch AC Duct Fan
You can find this fan easily in an online marketplace. The fan we used in these instructions is labelled as “Oblique-flow pressurized duct fan Model: ZA-100-1”, a 4-inch AC fan with 220m^3/h airflow, 2600r/min speed, and 35W power. Since it is an AC (alternating current) fan, you can plug it in directly to a standard electrical outlet without the need for an AC/DC power adapter.

4-Inch Inner-Diameter Insulated Duct
The duct is the path for the filtered air sucked from outdoors into your house. At one end, it connects to the duct fan, and the other end is placed into the room through a wall hole or a modified window insert (you can run the duct through the window gap and close that gap with a simple material like plywood board once you find a suitable installation position, and make sure you seal the gap tightly around the duct). We recommend using a duct with fiber wool insulation to dampen the fan noise.

Assembly & Installation
Assembling this DIY PPS is almost effortless. You only need to connect all four main components (no special tools required). Then put the unit outdoors and put the open end of the duct through a wall hole or window toward the room.


- Insert the larger end of the adapter into the HEPA filter.
- Insert the duct fan into the adapter, ensuring the airflow points away from the filter.
- Attach the duct to the fan outlet and wrap securely with aluminium foil tape to ensure an airtight seal.
- Place the main unit outdoors, running the free end of the duct indoors through a door or window gap.
- Close and seal the gap around the duct. You can use a simple material like a plywood board to close this gap. Please make sure that the gap is sealed tightly.
Conclusion
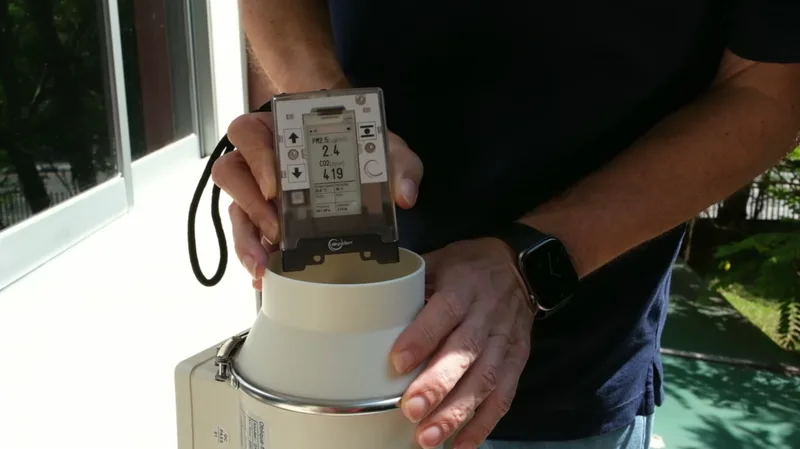
In our quick test, we measured the PM2.5 concentration directly at the air outlet. With the fan off, the reading was around 17 µg/m³. After we turned the fan on, it dropped rapidly and settled below 1 µg/m³. This shows that the filter, adapter and duct connections are doing their job as the air being pushed into the room is almost free of particles.
Keep in mind that this measures the air coming out of the duct, not the room as a whole. How clean the room gets depends on its size, how leaky it is, and how well you seal the gap around the duct. The fan needs to supply enough filtered air to keep the room at a slight positive pressure, so that air leaks outwards through the gaps instead of dirty air leaking in. If you have an air quality monitor, place it in the room and watch both PM2.5 and CO2 over a few days to see how the system performs in your space.
For around $50 and no special tools, this is a simple way to try positive pressure at home. If you want to understand why it works, or how to adapt it to your own space, the articles linked below go into the details.