When people first set up an outdoor air quality monitor, they usually focus on the obvious things: getting power to the device, connecting it to Wi-Fi or cellular, and making sure data appears on the dashboard. Those steps matter, of course. But there is another factor that has just as much influence on the quality of the data: where the monitor is placed.
A good outdoor monitor can only measure the air it is actually exposed to. If it is mounted in the wrong spot, the readings may still look precise, but they may not represent the air you really want to understand. In other words, bad placement can create bad conclusions.
The good news is that most placement mistakes are avoidable. Here are five common ones.
1. Choosing the easiest spot instead of the right spot
This is probably the most common mistake. People often pick the location that is easiest to install: the nearest wall socket, the most convenient balcony, or the first place where the bracket fits. That is understandable, but convenience should come after purpose.
Before mounting a monitor, it helps to ask a simple question: what exactly am I trying to measure?
If the goal is to understand the general air quality in a neighborhood, school, or community, then the monitor should be placed somewhere that reflects the broader outdoor environment. In that case, it should not sit right next to a direct pollution source such as a kitchen exhaust, generator, busy loading area, chimney, or construction activity.
But if the goal is different - for example, to understand how much traffic pollution reaches a street-facing building - then placing the monitor closer to that source may be completely valid. The mistake is not being near a pollution source. The mistake is placing the monitor without being clear about the measurement objective.
2. Mounting the monitor in direct sun or next to heat-radiating surfaces
Outdoor monitors should measure the surrounding air, not the heat build-up from a wall, roof edge, or sun-baked surface.
A common placement problem is mounting the device where it gets strong direct sunlight for long parts of the day. Another is placing it next to surfaces that absorb and radiate heat, such as dark concrete, metal cladding, asphalt, or rooftops. These conditions can distort temperature readings and create an environment that is less representative of normal ambient airflow.
That is why shaded locations are usually preferred. Shade helps reduce heat stress on the device and gives more stable measurement conditions. It does not mean the monitor must be hidden away in an enclosed corner. It still needs airflow. But if you can choose between a sun-exposed wall and a shaded, open location, the shaded one is usually the better option.
The same thinking applies to reflective or heat-retaining surfaces. A monitor mounted right next to a hot wall may be technically outdoors, but it is not necessarily measuring typical outdoor conditions.
3. Placing it too close to windows, doors, vents, or exhaust points
Another frequent mistake is putting the monitor near air that does not represent the wider outdoor environment.
For example, a monitor mounted near a window may be affected by air coming from inside the building. A unit mounted near a door may see repeated short bursts of altered airflow. Near an air conditioner, exhaust vent, fan outlet, dryer vent, or kitchen vent, the problem is even bigger: the monitor can be exposed to highly localized plumes that have little to do with the area as a whole.
This can lead to confusing readings. A user may think they are measuring the local outdoor air, while the device is actually reacting to their own building.
The same issue applies to nearby pollution sources. If the monitor is right beside a chimney, burning area, parked idling vehicle, or other concentrated emission point, the readings may be dominated by that one source. Again, that is not always wrong - sometimes it is intentional - but it should be a deliberate decision, not an accident.
4. Blocking airflow or mounting it in the wrong orientation
Outdoor air monitoring depends on airflow. If air cannot move naturally around the device, the readings are less likely to reflect real conditions.
This is why placement in tight corners, deeply recessed wall spaces, dense vegetation, or awkward enclosed spots is risky. These locations may protect the monitor from weather, but they can also create stagnant air. A monitor needs a spot where air can move around it naturally.
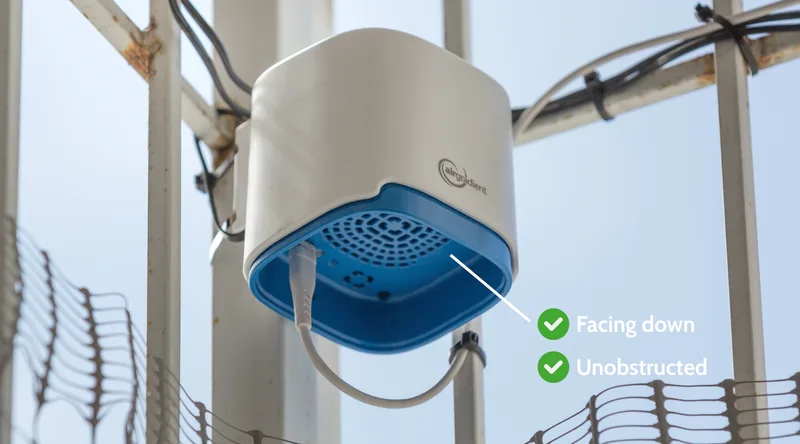
Orientation matters too. For AirGradient outdoor monitors, the vent should face downward and remain unobstructed. That detail sounds small, but it is important. If the vent is blocked, partially covered, or pointed the wrong way, airflow and weather protection can both be compromised.
Vegetation is another overlooked issue. Mounting a monitor right inside a bush, under heavy foliage, or very close to tree branches may seem like a good way to create shade, but it can reduce airflow and increase the chance of debris or insects interfering with the monitor. That kind of interference is surprisingly common.
A better approach is to look for a place that is both sheltered and open: protected from harsh direct exposure when possible, but still naturally ventilated.
5. Making the installation permanent before testing power, connectivity, and maintenance access
This mistake shows up after the monitor is already on the wall.
Someone finds a good-looking location, drills it in place, routes the cable, and only then discovers that the Wi-Fi is weak, the power cable is awkward, the dashboard connection drops out, or routine cleaning will require a ladder every time.
A much better approach is to test first and mount permanently second. Before final installation, power the monitor, connect it to the dashboard, and confirm it is actually reporting data reliably. If possible, temporarily mount it and observe whether nearby conditions create odd spikes or obvious interference. This short testing step can save a lot of frustration later.
Maintenance access matters too. Outdoor monitors do not usually need heavy maintenance, but they still benefit from occasional cleaning of the vent and sensor area, especially in dusty or insect-prone environments. If the monitor is mounted in a location that is difficult or unsafe to reach, even simple upkeep becomes less likely.
Then there is the physical installation itself. Mounting hardware should be weather-resistant and secure. Cables should be managed so they are not easy to pull loose or leave exposed points vulnerable to damage. The monitor should be high enough to avoid easy interference, but still practical to access. AirGradient’s deployment guidance recommends installing at least 100 cm above the floor or surface below.
In short: a professional installation is not just about where the monitor looks good. It is about whether it works reliably over time.
Final thought
Good monitor placement is really about judgment. You are balancing data quality, safety, power, connectivity, weather protection, maintenance, and the actual question you want the monitor to answer.
If you avoid the five mistakes above, you are already far ahead of many first-time deployments. Choose the site based on the monitoring goal. Prefer shade without sacrificing airflow. Keep distance from windows, vents, and direct emissions unless you intentionally want source-specific readings. Make sure the monitor is oriented correctly. And test everything before calling the installation finished.
A well-placed monitor provides you with data you can actually trust.
In case you want more information on outdoor monitor installation after reading this article, the most directly relevant AirGradient references are the professional mounting guide and the Open Air installation instructions PDF.