AirGradient Open Air Max: Device Overview and First Test
AirGradient Open Air Max: Device Overview and First Test
This article introduces the main parts of the AirGradient Open Air Max and guides you through the recommended first test. It also serves as the starting point for setup, connectivity, installation, maintenance, and troubleshooting.
Device Overview
The AirGradient Open Air Max comes with pre-installed batteries and a pre-installed SIM card. It is designed to be ready for testing and quick deployment.
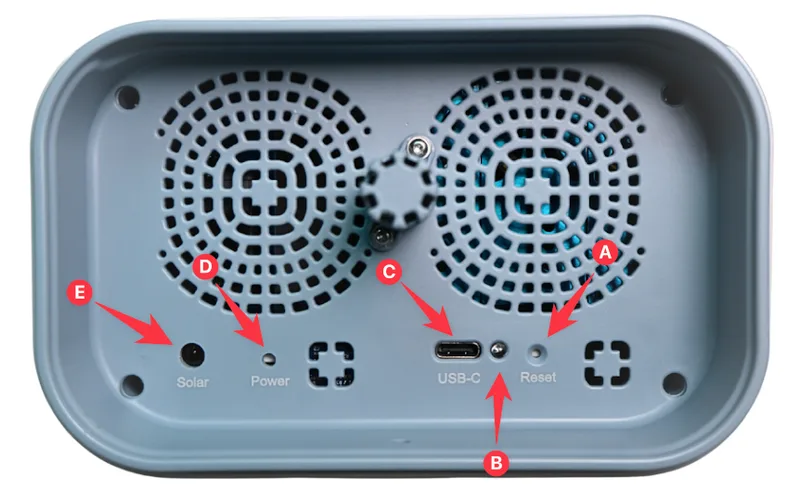
The device has the following external controls and ports:
| # | Part | Description |
|---|---|---|
| A | Reset button | Used to enter connection mode |
| B | Status LED | Shows startup, connection, normal, and error states |
| C | USB-C port | Powers the device directly and charges the batteries |
| D | Battery power switch | Enables battery operation and backup |
| E | Solar power input | Connects to the included solar panel |
You will need a paperclip, pin, toothpick, or another small narrow tool to press the battery power switch (D).
For more information about the available power sources, battery operation, charging, and solar requirements, see Power, Battery Backup, and Solar.
Powering on for the first time
The Open Air Max ships with battery backup switched off by default.
You can power on the device in either of these ways:
- Turn the battery power switch ON.
- Plug the device into USB-C power.
The device can run from USB-C while the battery power switch is OFF. However, battery backup and battery charging only work when the switch is ON.
The switch is ON when it is recessed, meaning it has been pushed inward. See this video for guidance.
For field deployment, the battery power switch should always be ON.
When the device powers on, the status LED lights solid blue and then shows its startup and connection progress. Review Status LED and Reporting Intervals to understand the LED patterns, normal reporting intervals/delays, and power-saving modes.
Connect the monitor
By default, the Open Air Max uses the pre-installed SIM card and attempts to connect to a compatible cellular network automatically. No configuration is normally required.
If you need to check coverage, understand the included data plan, install your own SIM card, or configure the APN required by a local SIM, see Cellular Connectivity and SIM Card and Change the APN for a Local SIM Card.
If cellular coverage is unavailable or WiFi is preferred at the installation location, follow Switching to WiFi. The same procedure can be used to switch the monitor back to cellular later.
Add the monitor to the dashboard
In most cases, your monitor will already be added to the dashboard for you, but if it is not:
Add the Open Air Max to your AirGradient Dashboard using the serial number printed on the back of the device. The dashboard lets you view measurements and confirm that the monitor is reporting correctly.
Follow Adding to the Dashboard for the onboarding steps and instructions for displaying battery and solar-panel voltage.
After startup, allow at least 15 minutes for the first data to appear. Cellular devices normally transmit readings in batches, so a short delay is expected.
Testing before permanent installation
Before deploying your monitor in the field, charge the batteries via USB-C to a sufficient level.
Pre-charging ensures the device is ready to report data immediately upon deployment. If the batteries are not charged beforehand, the device will require 6-8 hours of direct sunlight to reach a full charge, which can cause data reporting downtime until that charge is achieved.
You can confirm this on the AirGradient dashboard, where a sufficient charge is defined as at least 11-12V and is indicated by a green color. For instructions on how to view battery and solar data see Viewing Battery and Solar Data in Adding to the Dashboard.
Important Note: For the batteries to charge and operate the device at night, the battery power switch must be in the ON position. Be aware that in direct sunlight, the solar panel can power the monitor directly, making it appear fully operational even if the battery switch is OFF. If deployed with the switch OFF, the batteries will not charge, and the monitor will shut down as soon as the sun sets, requiring a return visit to the site. Always physically verify the switch is ON.
Before mounting the monitor permanently, operate it at the intended location for at least one continuous hour. During this time, confirm that:
- The battery power switch is ON.
- The monitor powers on and remains on without USB-C power.
- The status LED completes its startup sequence without showing an error.
- The monitor connects through cellular or WiFi.
- Measurements appear on the AirGradient Dashboard.
- The battery voltage shows sufficient charge in the dashboard (at least 11-12 V, indicated by a green color).
- The solar panel receives at least 3-4 hours of direct sunlight per day.
Testing first helps identify poor network coverage, insufficient solar exposure, or other deployment issues while the device is still easy to access.
Once the test is successful, see Mounting the AirGradient Open Air Max for location selection, solar-panel placement, mounting options, and the required device orientation.
After installation
The Open Air Max requires little routine maintenance, but the sensor intake and solar panel should be inspected periodically. See Maintenance and Repair for guidance.
If the monitor does not report data, loses power, shows a connection error, drops offline, or produces unusual particulate-matter readings, use the Open Air Max Troubleshooting Guide.