AirGradient ONE: Setup and Overview
AirGradient ONE: Setup and Overview
Welcome to your AirGradient ONE. This guide takes you from opening your monitor, setting it up, understanding its readings and more.
1. Unbox and prepare the monitor
Fully assembled monitors
Fully assembled monitors, as the name suggests, come already assembled. See what comes in the box: Unboxing the AirGradient ONE.
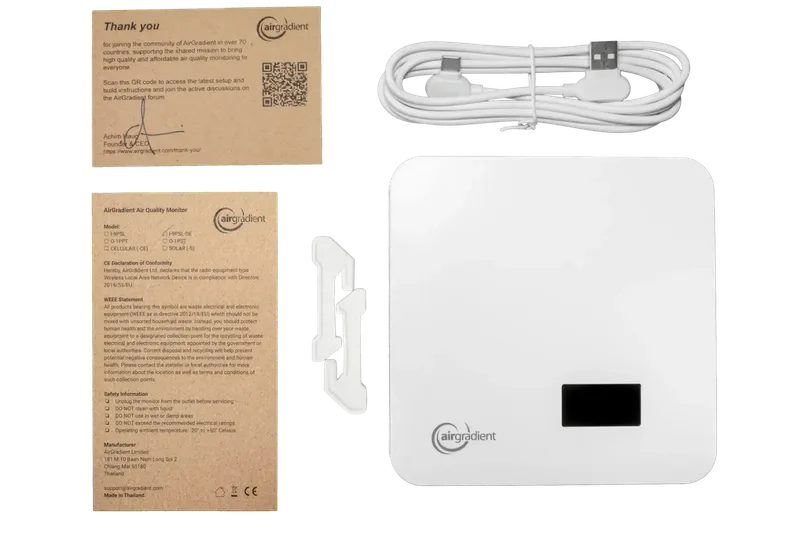
If you plan to place it on a desk or shelf, slide the two included stands into the vents at the bottom of the enclosure. See this video for guidance: AirGradient ONE - How to Attach Stands.
AirGradient ONE DIY kit
Complete the AirGradient ONE DIY kit assembly guide before connecting to power.
2. Power up the monitor
Connect the included USB cable to a stable 5 V, 2 A USB power adapter. The adapter is not included.
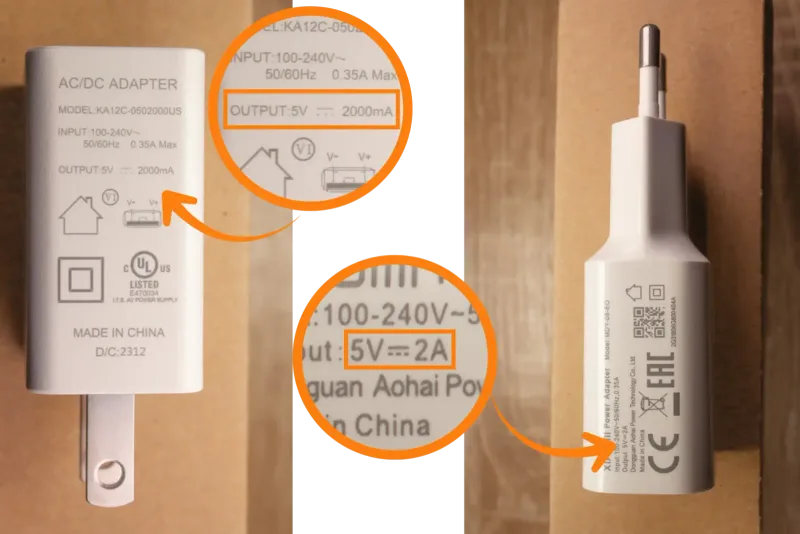
See Powering the AirGradient ONE for complete power guidance.
3. Connect the monitor to WiFi
Follow Connecting Your AirGradient ONE to WiFi. The AirGradient ONE requires a 2.4 GHz WiFi network.
You can also use the monitor without WiFi: Running the AirGradient ONE in Offline Mode.
In Offline Mode, readings remain visible on the monitor but are not stored in the AirGradient Dashboard.
4. Create your Dashboard account and add the monitor
Follow Registering Your AirGradient ONE on the AirGradient Dashboard.
The monitor must be connected to WiFi and registered on the Dashboard before data appears in the Dashboard. You may complete these two tasks in either order. Allow up to five minutes after completing both steps for readings to appear.
5. Where the readings appear
On the monitor
The LED display shows current local readings. The LED bar provides an at-a-glance indication based on its configured parameter.
See Understanding the LED Indicators on Your AirGradient ONE for the LED colors and status indications.
In the AirGradient Dashboard
Open app.airgradient.com to view current readings, historical graphs, settings, exports, and monitor status.
Use AirGradient Dashboard: Measurements and Interpretation to learn what each measurement and unit means.
6. Choose the monitor location
Place the ONE where it represents the air people normally breathe. Keep its airflow openings clear and avoid direct sunlight, ventilation outlets, and placing it immediately beside a pollution source unless that source is what you intend to investigate.
See How Do I Mount or Place the AirGradient ONE for complete placement and mounting instructions.
Optional next steps
Install the AirGradient Map app
The AirGradient Map app provides mobile access to your monitors, the public air-quality map, bookmarked locations, alerts, and community information.
Sign in with your AirGradient dashboard account details to access supported monitor features.
Change the display and LED settings
Use Control the LEDs and Display on the AirGradient ONE to adjust brightness, schedules, and what the LED bar represents.
Add other Dashboard users
Dashboard administrators can invite other people and control their access. See Managing Users and Permissions in the AirGradient Dashboard.
Learn about the monitor and its data
Export Dashboard data as a CSV file
Follow How to Export Data from the AirGradient Dashboard.
To understand the columns in the downloaded file, see What Data Is Included in an AirGradient Dashboard CSV Export?.
Review calibration settings
- Particulate Matter (PM) Sensor Calibration Guide
- Carbon Dioxide (CO2) Sensor Calibration Guide
- Temperature/Humidity Sensor Calibration Guide
- TVOC/NOx Sensor Calibration Guide
Reset or troubleshoot WiFi
- AirGradient ONE: Resetting the WiFi Configuration
- Troubleshooting WiFi Connectivity Issues
- Why Is My AirGradient ONE Connected to WiFi but Offline in the Dashboard?
Advanced setup
Use MQTT Configuration AirGradient ONE to configure an MQTT broker through the AirGradient Dashboard.
For a local-only setup, see How to Configure MQTT Locally Without the AirGradient Dashboard.
Need more help?
If a setup step fails, use the troubleshooting section in the linked setup article. For further assistance, contact support or ask the community at the AirGradient Forum.